Why Your Plant Leaves Are Turning Yellow—and How You Can Fix It

Why Your Plant Leaves Are Turning Yellow—and How You Can Fix It
Yellowing leaves on your beloved plant can be concerning, but it’s a common issue that can be addressed with a bit of detective work. Understanding the underlying causes and implementing the right solutions can help bring your plant back to vibrant health.
1. Overwatering
Overwatering is one of the most common reasons for yellowing leaves. When plants sit in soggy soil, their roots can become waterlogged, leading to poor oxygen circulation and root rot.
Solution: Allow the soil to dry out between waterings. Ensure your plant’s pot has proper drainage, and consider using a well-draining potting mix. If you notice root rot, trim the affected roots and repot the plant in fresh soil.
2. Underwatering
On the flip side, underwater can also cause leaves to turn yellow. When a plant doesn’t receive enough water, it becomes stressed, leading to dry, brittle leaves.
Solution: Check the soil moisture regularly. Water your plant thoroughly when the top inch of soil feels dry. Be mindful of your plant’s specific water needs, as some plants require more frequent watering than others.
3. Nutrient Deficiency
Plants need a balanced diet of nutrients to thrive. A lack of essential nutrients like nitrogen, potassium, or magnesium can lead to yellowing leaves.
Solution: Fertilize your plant with a balanced, water-soluble fertilizer according to the package instructions. Consider using a fertilizer specifically designed for your type of plant. Regularly test the soil to ensure it has the right nutrient balance.
4. Improper Lighting
Insufficient or excessive light can stress plants, causing their leaves to yellow. Plants that need bright light may struggle in low light, while shade-loving plants can suffer in direct sunlight.
Solution: Assess your plant’s lighting needs and adjust its placement accordingly. Move light-loving plants closer to a window or provide supplemental grow lights if needed. For plants that prefer indirect light, consider moving them to a spot with filtered sunlight.
5. Pests and Diseases
Pests like spider mites, aphids, or scale can damage plant leaves, leading to yellowing. Additionally, fungal or bacterial infections can cause similar symptoms.
Solution: Inspect your plant closely for signs of pests or disease. Use insecticidal soap or neem oil to treat pest infestations. If you suspect a disease, remove the affected leaves and treat the plant with an appropriate fungicide or bactericide.
6. Temperature Stress
Extreme temperature fluctuations or placing your plant in a drafty area can cause leaves to yellow. Plants are sensitive to changes in their environment, and temperature stress is a common culprit.
Solution: Keep your plant in a stable environment away from drafts, air conditioning vents, or heaters. Ensure the temperature remains within the optimal range for your specific plant species.
7. Aging Leaves
Sometimes, yellowing leaves are simply a natural part of a plant’s life cycle. Older leaves will eventually yellow and drop off as new growth emerges.
Solution: Prune away yellowing or dead leaves to promote healthy growth. Regular maintenance will help keep your plant looking its best.
8. Natural Seasonal Change
During autumn, many plants naturally shed older leaves as they prepare for the winter months. This process often includes the yellowing of leaves before they drop.
Solution: If the yellowing is due to natural aging, there’s no need to worry. Simply remove the dead leaves to maintain your plant’s appearance. However, if the yellowing seems excessive or affects new growth, consider investigating other potential causes.
Sometimes, yellowing leaves are simply a natural part of a plant’s life cycle. Older leaves will eventually yellow and drop off as new growth emerges.
Solution: Prune away yellowing or dead leaves to promote healthy growth. Regular maintenance will help keep your plant looking its best.

Vegetables and Herbs to Plant in August

Vegetables and Herbs to Plant in August
As summer starts winding down, August is the perfect time to plan your fall harvest. Whether you’re extending your garden’s productivity or starting fresh, there are plenty of vegetables and herbs that thrive when planted this month. Here’s a guide to what you should be sowing in August to enjoy a bountiful harvest in the months to come.
Vegetables to Plant in August
  1. Leafy Greens
    • Lettuce: Varieties like romaine, butterhead, and leaf lettuce grow quickly and are perfect for fall salads. They thrive in cooler temperatures, making August an ideal time to plant them.
    • Spinach: Spinach is another cool-season crop that grows well when planted in late summer. Choose fast-growing varieties to ensure a full harvest before the first frost.
  1. Root Vegetables
    • Carrots: Planting carrots in August gives you a chance to harvest sweet and tender roots in the fall. Look for quick-maturing varieties to beat the frost.
    • Beets: Beets are hardy and can be sown in August for a fall harvest. Both the roots and the greens are edible, adding versatility to your garden.
  1. Brassicas
    • Broccoli: Broccoli is a cool-weather crop that does well when planted in late summer. It will mature in the cooler days of fall, producing tender heads.
    • Kale: Kale thrives in cooler weather and even becomes sweeter after a light frost. It’s an excellent choice for August planting.
  1. Legumes
    • Bush Beans: If your region has a longer growing season, you can still plant bush beans in early August. They grow quickly and can produce a harvest before the first frost.
    • Peas: Certain varieties of peas, like snow peas or sugar snap peas, can be planted in August for a fall harvest.
Herbs to Plant in August
  1. Cilantro
    • Cilantro loves cooler weather, making August a great time to plant it. It grows quickly and can be harvested for fresh leaves or allowed to go to seed for coriander.
  1. Parsley
    • Parsley is a biennial herb that can be planted in August for a fall harvest. It’s hardy enough to survive the first frosts, providing fresh greens well into the season.
  1. Chives
    • Chives are a perennial herb that can be sown in August. They grow well in cooler temperatures and will be ready to harvest before winter sets in.
  1. Dill
    • Dill is another herb that prefers cooler temperatures. Planting in August allows for a late-season harvest of both its leaves and seeds.
Tips for Successful August Planting
  • Soil Preparation: Enrich your soil with compost to give your new plants the nutrients they need. Ensure the soil is well-drained to prevent root rot.
  • Watering: August can be hot, so keep an eye on moisture levels. Water deeply and consistently to help your plants establish strong roots.
  • Mulching: Apply a layer of mulch around your plants to retain moisture and keep the soil cool. This will also help reduce weed growth.
  • Pest Control: As the growing season progresses, pests can become more active. Keep an eye out for common garden pests like aphids and caterpillars, and take action to control them.
  • Succession Planting: For crops like lettuce and spinach, consider succession planting every two weeks to ensure a continuous harvest throughout the fall.
By planting the right vegetables and herbs in August, you can extend your gardening season and enjoy fresh, homegrown produce well into the cooler months. Happy gardening!

How to Tell When Your Fruits and Vegetables are Ready to Harvest

How to Tell When Your Fruits and Vegetables are Ready to Harvest
Harvesting your garden’s bounty at the right time ensures you enjoy the peak flavor and nutrition of your fruits and vegetables. Here’s a guide to help you determine when your produce is ready to pick.
General Tips for Harvesting
  1. Check for Full Color: Most fruits and vegetables develop a deep, vibrant color when they are ripe. Look for uniformity in color.
  2. Feel for Firmness: Gently squeeze the produce. It should be firm but not hard. Some vegetables, like cucumbers and zucchini, should be firm and crisp.
  3. Test for Size: Know the typical size for the variety you are growing. Overgrown vegetables can become tough or lose flavor.
  4. Look for Natural Shedding: Some fruits, like apples and peaches, will start to naturally fall from the plant when they are ripe.
  5. Smell the Aroma: Many ripe fruits, like tomatoes and melons, will emit a strong, pleasant fragrance.
Specific Guidelines
Tomatoes: Fully ripe when they are deep red (or yellow/orange, depending on the variety) and slightly soft to the touch.
Peppers: Ready to harvest when they are firm and reach the color indicated for their variety (green, red, yellow, etc.).
Cucumbers: Best when they are firm, green, and smooth. Avoid harvesting them when they start turning yellow or become overly large.
Zucchini: Ideal size is about 6 to 8 inches long. Larger zucchinis can be tough and seedy.
Carrots: Tops should be about ¾ to 1 inch in diameter. Pull one to check size.
Lettuce and Spinach: Leaves should be tender and firm. Harvest before they start to bolt (flower).
Peas and Beans: Pods should be firm and snap easily when bent. Peas should fill out the pods.
Corn: Silks turn brown, and kernels should be plump and milky when pierced.
Melons (Watermelons, Cantaloupes):
  • Watermelons: Check the underside for a creamy yellow spot where it touches the ground.
  • Cantaloupes: Ripe when they have a sweet aroma and the stem easily separates from the fruit.
Strawberries: Fully red with no white or green spots and emit a sweet fragrance.
Apples: Should come off the tree with a slight twist and have developed their full color.

The Secret to Get Rid of Plant Pests

The Secret to Get Rid of Plant Pests
Plant pests can be a gardener’s worst nightmare, wreaking havoc on otherwise healthy plants. However, there are effective ways to combat these invaders and restore your garden to its thriving state. In this article, we’ll uncover the secret to getting rid of plant pests and keeping your plants pest-free.
Identify the Culprits
Before you can tackle the pest problem, it’s essential to identify which pests are plaguing your plants. Common plant pests include aphids, spider mites, whiteflies, and scale insects. Carefully inspect your plants, looking for signs like chewed leaves, sticky residue, or tiny moving specks.
Natural Predators: Nature’s Pest Control
One of the most effective and eco-friendly ways to control pests is by encouraging natural predators. Ladybugs, lacewings, and predatory mites are excellent at keeping pest populations in check. Introduce these beneficial insects to your garden or attract them by planting flowers they love, such as marigolds and daisies.
Homemade Pest Sprays
Homemade pest sprays can be a safe and economical solution. A simple mixture of water, dish soap, and a few drops of neem oil can work wonders against a variety of pests. Spray the solution directly onto the affected areas of your plants, ensuring thorough coverage.
Organic Insecticides
For more severe infestations, organic insecticides can provide a stronger line of defense. Products containing ingredients like pyrethrin, spinosad, or insecticidal soap are effective against many common pests and are less harmful to the environment compared to chemical pesticides.
Physical Barriers
Physical barriers can prevent pests from reaching your plants in the first place. Row covers, mesh netting, and even simple aluminum foil around the base of your plants can deter many pests. These barriers also protect your plants from extreme weather conditions, which can sometimes stress plants and make them more susceptible to pests.
Regular Maintenance
Keeping your garden clean and well-maintained is crucial for pest prevention. Remove dead leaves, fallen fruits, and debris regularly, as these can attract pests. Regularly check your plants for early signs of pest activity and address issues promptly to prevent infestations from spreading.
Companion Planting
Companion planting is a time-tested method for pest control. Planting certain herbs and flowers alongside your vegetables and other plants can repel pests naturally. For example, basil repels aphids and mosquitoes, while marigolds deter nematodes and other harmful insects.
Healthy Soil, Healthy Plants
Healthy plants are more resistant to pests and diseases. Ensure your plants receive proper nutrients by using high-quality compost and fertilizers. Regularly test your soil and amend it as needed to maintain optimal growing conditions.

Using Ice Cubes To Water Houseplants?

Using Ice Cubes To Water Houseplants? 
Watering houseplants can sometimes be tricky, especially when trying to avoid overwatering or underwatering. A method that has gained popularity for its convenience and control is using ice cubes. But is this technique suitable for all plants? Let’s explore the pros and cons to help you decide if it’s right for your green companions.
Benefits of Using Ice Cubes
  1. Controlled Watering: One of the main advantages of using ice cubes is that they melt slowly, providing a gradual release of water. This can help prevent the common issue of overwatering, as the soil absorbs the moisture at a more measured pace.
  2. Convenience: Ice cubes offer an easy and mess-free way to water your plants. No need for watering cans or measuring cups—just place a few ice cubes on the soil and let them do the work.
  3. Consistency: This method can help you maintain a regular watering schedule. By using a set number of ice cubes each time, you can ensure your plants receive a consistent amount of water.
Potential Drawbacks
  1. Temperature Shock: One of the biggest concerns with using ice cubes is the potential for cold shock to the roots. Many houseplants, especially tropical varieties, prefer warm conditions and can be sensitive to sudden temperature changes.
  2. Uneven Water Distribution: Ice cubes might not always distribute water evenly across the soil. This can lead to dry spots, where some roots might not receive enough moisture while others might get too much.
  3. Root Damage: Prolonged exposure to cold temperatures from ice cubes can damage the roots over time, affecting the overall health of your plant.
Best Practices for Using Ice Cubes
  1. Use Small Ice Cubes: To minimize the risk of temperature shock, opt for smaller ice cubes. They will melt faster, reducing the exposure of roots to cold temperatures.
  2. Proper Placement: Place the ice cubes around the edges of the pot rather than directly at the base of the plant. This helps distribute the water more evenly and prevents the cold ice from coming into direct contact with the plant’s stem and roots.
  3. Monitor Plant Response: Pay close attention to how your plants react to this watering method. If you notice signs of distress such as yellowing leaves or stunted growth, it may be best to switch back to traditional watering methods.
Suitable Plants for Ice Cube Watering
  • Orchids: Many orchid enthusiasts use ice cubes to water their plants. The slow release of water mimics the natural conditions of their native habitats, where they receive moisture gradually from the air.
  • Succulents and Cacti: These plants generally prefer dry conditions and are not well-suited for ice cube watering. They can be sensitive to cold and excess moisture.
While using ice cubes to water houseplants can be a convenient method, it’s not suitable for all plant types. It’s crucial to consider your plant’s specific needs and monitor their response to this technique. If your plants thrive with this method, it can be a handy way to ensure they get the right amount of water. However, if you notice any negative effects, it might be better to stick to more traditional watering practices.

Edible Weeds Likely Growing in Your Yard

Edible Weeds Likely Growing in Your Yard
Discover the surprising treasures hidden in your backyard! While many of us spend time pulling weeds, there are some that are not only harmless but also edible and nutritious. Let’s explore some common edible weeds that might be growing right under your nose. Before foraging, ensure you have correctly identified the plant and that it hasn’t been exposed to pesticides or other chemicals.
Dandelion
Description: With its bright yellow flowers and toothed leaves, the dandelion is one of the most recognizable weeds.
Edibility: Both the leaves and flowers are edible. Young leaves are less bitter and can be used in salads, while the flowers can be made into tea or used in recipes.
Nutritional Benefits: Dandelions are rich in vitamins A, C, and K. They also contain minerals like iron and calcium.
Uses:
  • Salads: Mix young dandelion leaves with other greens for a nutritious salad.
  • Tea: Brew dandelion flowers into a soothing tea.
  • Cooking: Sauté the greens with garlic and olive oil for a tasty side dish.
Clover
Description: Clover features trifoliate leaves and small white or pink flowers.
Edibility: Clover leaves and flowers are edible. They can be added to salads, soups, or even used to make tea.
Nutritional Benefits: Clover is a good source of protein and vitamins, particularly vitamin C.
Uses:
  • Salads: Add clover leaves to your salads for a mild, sweet flavor.
  • Tea: Dry the flowers and use them to make a mild, calming tea.
  • Soups: Use clover leaves in soups for added nutrients.
Purslane
Description: This low-growing succulent has thick, reddish stems and small, green leaves.
Edibility: Purslane is rich in omega-3 fatty acids and can be eaten raw in salads or cooked like spinach.
Nutritional Benefits: Purslane is a powerhouse of nutrition, containing high levels of omega-3 fatty acids, vitamins A, C, and E, as well as magnesium, potassium, and iron.
Uses:
  • Salads: Add raw purslane leaves and stems to salads for a slightly tangy, crisp texture.
  • Cooking: Sauté or steam purslane like spinach, or add it to stir-fries.
  • Smoothies: Blend purslane into green smoothies for an extra nutrient boost.
Chickweed
Description: Chickweed has small, star-shaped white flowers and bright green leaves.
Edibility: Both the leaves and stems are edible. Chickweed is great in salads, sandwiches, or as a cooked green.
Nutritional Benefits: Chickweed is rich in vitamins A, C, and D, as well as iron, calcium, and magnesium.
Uses:
  • Salads: Add chickweed to salads for a fresh, mild flavor.
  • Sandwiches: Use chickweed in sandwiches as a crunchy green addition.
  • Cooking: Sauté chickweed with garlic and olive oil, or add it to soups and stews.
Plantain
Description: Not to be confused with the banana-like fruit, this plantain has broad, oval leaves.
Edibility: Plantain leaves can be eaten raw or cooked. They are slightly bitter when raw but become milder when cooked.
Nutritional Benefits: Plantain leaves are high in vitamins A and C, calcium, and fiber.
Uses:
  • Salads: Use young plantain leaves in salads for a slightly bitter, earthy flavor.
  • Tea: Brew plantain leaves into a tea known for its soothing properties.
  • Cooking: Cook plantain leaves like spinach, or add them to soups and stews.
Lamb’s Quarters
Description: Often mistaken for a weed, lamb’s quarters has diamond-shaped leaves with a white powdery coating.
Edibility: The leaves and seeds are edible. The leaves can be used like spinach, while the seeds can be used as a grain substitute.
Nutritional Benefits: Lamb’s quarters are rich in vitamins A, C, and K, as well as calcium, potassium, and magnesium.
Uses:
  • Salads: Use raw lamb’s quarters leaves in salads.
  • Cooking: Sauté or steam the leaves, or use them in savory cake soups and casseroles.
  • Seeds: Harvest the seeds and use them like quinoa in various dishes.
Wild Violet
Description: With heart-shaped leaves and delicate purple flowers, wild violets are a charming addition to any yard.
Edibility: Both the leaves and flowers are edible. The flowers can be used to decorate desserts, while the leaves can be added to salads.
Nutritional Benefits: Wild violets are high in vitamins A and C.
Uses:
  • Salads: Add violet leaves to salads for a mild, green taste.
  • Desserts: Use the flowers to decorate cakes, cupcakes, and other desserts.
  • Tea: Brew the leaves and flowers into a refreshing tea.
Foraging Tips
  1. Proper Identification: Always be sure you have correctly identified a plant before consuming it. Use a reliable plant identification app or guidebook.
  2. Avoid Polluted Areas: Do not forage from areas that may have been exposed to pesticides, herbicides, or pollution.
  3. Harvest Responsibly: Take only what you need, and ensure that you are not damaging the plant population in the area.
  4. Start Small: When trying a new edible weed, start with a small amount to ensure you do not have an allergic reaction.
Warning
Health Risks: Some weeds may look similar to edible ones but can be toxic. Misidentification can lead to serious health risks. Always double-check with a reputable source and consider consulting with an expert.
Allergies: Even edible weeds can cause allergic reactions in some individuals. Start with small amounts to see how your body reacts. Pesticides and Chemicals: Never consume weeds from areas that may have been treated with pesticides, herbicides, or other chemicals, as these substances can be harmful if ingested.

How To Keep Your Plants Alive While On Vacation

How To Keep Your Plants Alive While On Vacation

1. Watering Solutions
  • Self-Watering Systems: These systems often include a reservoir that slowly releases water into the soil. They are perfect for plants that need consistent moisture. Look for pots with built-in reservoirs or consider installing self-watering stakes that draw water from a nearby container.
  • Watering Globes: These glass or plastic globes can be filled with water and inserted into the soil. They slowly release water as the soil dries out. They are ideal for small to medium-sized plants.
  • DIY Watering Wicks: You can make your own watering wick system using cotton or nylon rope. Place one end of the wick in a container of water and the other end in the plant’s soil. The wick will draw water into the soil through capillary action, keeping it moist.
2. Group Plants Together

Humidity Bubbles: Placing your plants close together helps create a microenvironment with higher humidity. This can be particularly beneficial for tropical plants. To enhance this effect, you can also place a shallow tray filled with water and pebbles among the plants. The evaporating water will increase humidity levels.

3. Mulching

Soil Coverage: Mulch helps to retain soil moisture by reducing evaporation. Organic mulches like shredded bark, straw, or compost also improve soil health as they decompose. Apply a 1-2 inch layer of mulch around your plants, making sure not to pile it against the stems.

4. Move Plants to Shaded Areas

Reduce Sun Exposure: Even sun-loving plants can benefit from a break from direct sunlight when you’re away. Move potted plants to an area with indirect light, such as a north-facing window or a shaded patio. This will reduce their water needs and help prevent them from drying out too quickly.

5. Hydrate Plants Thoroughly Before Leaving

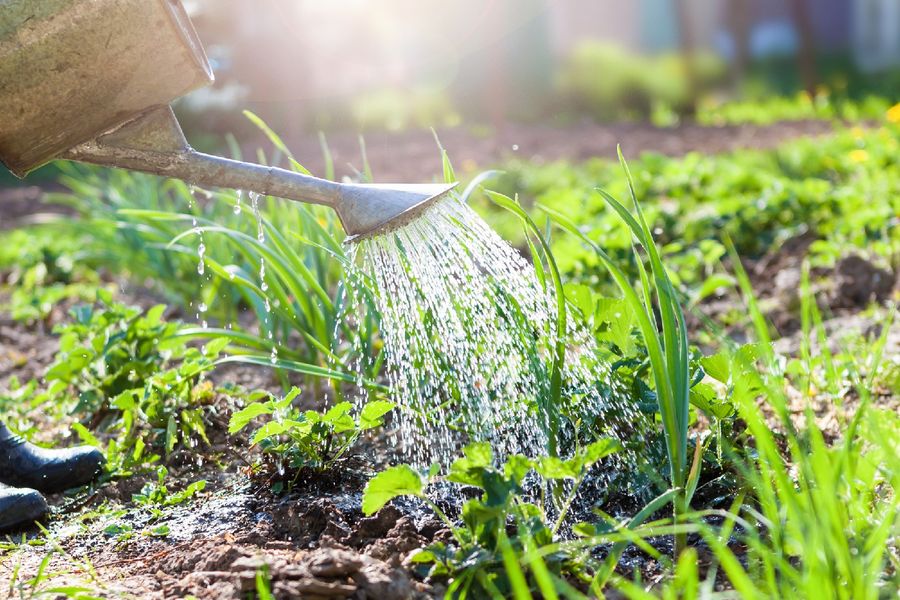
Deep Watering: Water your plants deeply before you go. This means watering until the soil is moist several inches down. For larger plants, consider bottom watering by placing the pot in a tray of water and letting the plant soak up the moisture from the bottom.

6. Prune Plants

Trim Excess Growth: Pruning helps to reduce the plant’s water consumption by removing dead, dying, or excess foliage. Focus on cutting back any flowers or new growth, which typically require more water.

7. Use Water-Retaining Crystals

Soil Additives: These crystals absorb and retain large amounts of water, which they release slowly over time. Mix them into the soil according to the package instructions before watering. They are particularly useful for pots and containers.

8. Test Before You Go

Trial Run: A week before your trip, set up your chosen watering system and monitor it to ensure it’s working properly. Adjust as needed to make sure your plants are getting the right amount of water without being overwatered.

By following these detailed steps, you can ensure your plants stay healthy and hydrated while you enjoy your vacation without worry.

How to Fertilize Tomatoes for a Big Harvest

How to Fertilize Tomatoes for a Big Harvest

Tomatoes are a beloved crop for many home gardeners, and with the right fertilization, you can achieve a bountiful harvest. This guide will walk you through the essential steps to fertilize your tomato plants effectively, ensuring they grow strong and produce abundant fruit.

Understanding Tomato Nutrient Needs

Tomatoes require a balanced mix of nutrients to thrive. The primary nutrients they need are nitrogen (N), phosphorus (P), and potassium (K), often referred to as NPK. Here’s what each nutrient does:

  • Nitrogen (N): Promotes healthy leaf and stem growth.
  • Phosphorus (P): Supports root development and flowering.
  • Potassium (K): Enhances overall plant health and disease resistance.
Choosing the Right Fertilizer

When selecting a fertilizer for your tomatoes, you can choose between organic and synthetic options. Both types have their benefits:

  • Organic Fertilizers: Examples include compost, manure, and fish emulsion. They improve soil structure and provide a slow-release of nutrients.
  • Synthetic Fertilizers: These are formulated to provide specific nutrient ratios and are available in granular or liquid forms. Look for a balanced fertilizer with an NPK ratio like 10-10-10 or one tailored for tomatoes, such as 5-10-10.
Fertilizing Stages

Tomatoes have different nutrient needs at various growth stages. Here’s a breakdown of how to fertilize at each stage:

Before Planting
Soil Preparation: Test your soil to determine its nutrient content and pH level. Aim for a pH between 6.0 and 6.8.
Amend the Soil: Add compost or aged manure to enrich the soil. If using synthetic fertilizer, mix it into the soil according to the package instructions.
After Planting
Initial Feeding: Once the seedlings are established, apply a starter fertilizer high in phosphorus to encourage root development. A common choice is a liquid fertilizer with a ratio of 4-12-4.
Side Dressing: About four weeks after planting, side dress your plants with a balanced fertilizer or one lower in nitrogen to prevent excessive foliage growth. Apply it in a shallow trench around the plant and water thoroughly.
Flowering and Fruiting
Boosting Blooms: As your plants begin to flower, switch to a fertilizer higher in potassium to support fruit development. A 5-10-10 ratio works well.
Regular Feeding: Continue to feed your plants every 3-4 weeks with the high-potassium fertilizer. Ensure even watering to prevent nutrient imbalances and blossom end rot.

Common Fertilization Problems
  • Yellowing Leaves: May indicate a nitrogen deficiency. Apply a balanced fertilizer or compost tea.
  • Blossom End Rot: Often caused by calcium deficiency. Ensure consistent watering and consider adding a calcium supplement.
  • Stunted Growth: Can result from nutrient imbalances or poor soil. Test your soil and amend as needed.

Fertilizing your tomato plants correctly is key to achieving a big harvest. By understanding their nutrient needs and providing the right nutrients at the right times, you can enjoy a plentiful supply of delicious tomatoes. Happy gardening!

Hot Summer Tips for Watering the Garden

Hot Summer Tips for Watering the Garden
1. Water Early in the Morning
Watering your garden early in the morning, ideally before 10 a.m., is the best time for several reasons. The temperatures are cooler, so less water evaporates compared to watering during the heat of the day. Additionally, plants have time to absorb the moisture before the sun becomes too intense, which helps them stay hydrated and healthy.
2. Deep Watering is Key
Instead of frequent, shallow watering, aim for deep watering sessions. This means watering slowly and thoroughly so that the water penetrates deep into the soil, reaching the roots. Deep watering encourages plants to develop deep root systems, making them more resilient to drought and heat stress. A good rule of thumb is to water until the top 6-8 inches of soil is moist.
3. Use Mulch to Retain Moisture
Mulching is a fantastic way to conserve water and keep your garden soil cool. Apply a 2-3 inch layer of organic mulch, such as straw, wood chips, or compost, around your plants. Mulch acts as a barrier, reducing water evaporation, suppressing weeds, and maintaining a more consistent soil temperature. It also improves soil structure and adds nutrients as it decomposes.
4. Focus on the Roots
When watering, aim the water at the base of the plants, directly onto the soil, rather than overhead. Watering the leaves can lead to fungal diseases, especially in hot and humid conditions. Using a soaker hose or drip irrigation system can be highly effective, as these methods deliver water directly to the roots where it’s needed most.
5. Adjust Watering Frequency Based on Soil Type
Different soil types have varying water retention capacities. Sandy soil drains quickly and may require more frequent watering, while clay soil retains water longer and needs less frequent watering. Observe your garden’s soil and adjust your watering schedule accordingly. Checking the soil moisture with your finger or a moisture meter can help you determine when it’s time to water again.
6. Water in the Evening (If Necessary)
If you can’t water in the morning, the next best time is in the late afternoon or early evening. However, avoid watering too late, as this can leave plants wet overnight, which may encourage fungal growth. Evening watering should be done early enough for the foliage to dry before nightfall.
7. Group Plants with Similar Water Needs
Grouping plants with similar water requirements together can make your watering routine more efficient. This way, you can avoid overwatering drought-tolerant plants or underwatering those that need more moisture. For example, succulents and cacti should be kept together and watered less frequently than vegetables or annual flowers.
8. Keep an Eye on Weather Conditions
Adjust your watering schedule based on the weather forecast. If rain is expected, hold off on watering to prevent over-saturating the soil. During extended periods of high heat and dry conditions, you may need to water more frequently. Monitoring the weather helps you make informed decisions and conserve water when possible.
9. Avoid Watering During Windy Days
Watering on windy days can lead to water waste as it evaporates or gets blown away before it reaches the soil. Choose calm days for watering to ensure that the water goes where it’s needed.
10. Use Water-Saving Tools
Consider using water-saving tools such as rain barrels to collect rainwater for your garden. This not only conserves water but also provides your plants with natural, untreated water. Additionally, using a rain gauge can help you keep track of how much rain your garden is receiving and adjust your watering schedule accordingly.
By following these hot summer watering tips, you can ensure that your garden remains vibrant and healthy despite the heat. Remember, proper watering is crucial for your plants’ survival and growth during the summer months.

What’s Wrong with My Plant?

What’s Wrong with My Plant?
1. Understanding Plant Symptoms
Before diving into specific issues, it’s essential to understand the symptoms your plant is exhibiting. Here are some common symptoms and what they might indicate:
  • Yellowing Leaves: Yellow leaves can be a sign of various problems, including overwatering, nutrient deficiencies, or improper lighting. The key is to observe the pattern of yellowing. For example, if the lower leaves are turning yellow first, it might be a sign of nitrogen deficiency. If the yellowing is more widespread and accompanied by soft, mushy stems, overwatering is likely the cause.
  • Wilting: Wilting is often due to underwatering, but it can also result from root rot, excessive heat, or even overwatering. Plants wilt when they cannot take up enough water to keep their cells turgid, either because there is not enough water in the soil or because the roots are damaged.
  • Brown Leaf Tips: This typically indicates a lack of humidity, over-fertilization, or salt buildup in the soil. If the air is too dry, especially for tropical plants, the leaf tips can dry out and turn brown. Over-fertilization can cause a buildup of salts in the soil, which can also damage the leaf tips.
  • Spotted Leaves: Fungal or bacterial infections can cause spots on leaves. In some cases, pests such as spider mites or thrips may also be the culprit. The spots can vary in color and shape, often appearing as black, brown, or yellow spots on the leaves.
  • Dropping Leaves: Sudden leaf drop can be a reaction to environmental stress, such as a change in temperature, humidity, or light. Some plants are particularly sensitive to changes and will drop leaves as a protective measure.
2. Common Plant Problems and Solutions
Overwatering
Symptoms: Yellowing leaves, wilting despite moist soil, root rot.
Diagnosis: Check the soil moisture level. If the soil is consistently wet and the plant shows symptoms of distress, overwatering is likely.
Solution:
  • Reduce watering frequency: Allow the soil to dry out between waterings. It’s crucial to understand the water needs of your specific plant.
  • Ensure proper drainage: Use pots with drainage holes and well-draining soil to prevent water from sitting at the bottom of the pot.
  • Trim affected roots and repot: If root rot is severe, gently remove the plant from its pot, trim away the rotted roots, and repot it in fresh, well-draining soil.
Underwatering
Symptoms: Wilting, dry soil, crispy leaves.
Diagnosis: Check the soil moisture. If the soil is dry and the plant is wilting, it is likely underwatered.
Solution:
  • Increase watering frequency: Water the plant thoroughly until water drains out of the bottom of the pot. Consistency is key to preventing underwatering.
  • Soil amendments: Ensure the soil can retain moisture by adding organic matter like compost or peat moss, which helps the soil hold onto water longer.
Improper Lighting
Symptoms: Yellowing leaves, leggy growth, no new growth.
Diagnosis: Observe the plant’s light exposure. Plants receiving too little light may grow leggy, while those receiving too much direct sunlight might have scorched leaves.
Solution:
  • Adjust the plant’s location: Ensure it receives the appropriate amount of light for its species. For instance, a shade-loving plant placed in direct sunlight will struggle.
  • Use grow lights: If natural light is insufficient, especially during the winter months, supplement with grow lights to provide the necessary light spectrum. Yellowing leaves, leggy growth, no new growth.
Nutrient Deficiencies
Symptoms: Yellowing leaves, stunted growth, poor blooming.
Diagnosis: Check for uniform yellowing (nitrogen deficiency) or specific patterns like interveinal chlorosis (magnesium deficiency).
Solution:
  • Use a balanced fertilizer: Apply a fertilizer appropriate for your plant type, following the recommended dosages.
  • Regular feeding schedule: Stick to a regular feeding schedule, but avoid over-fertilization, which can cause more harm than good.
Pests
Symptoms: Holes in leaves, sticky residue, visible insects.
Diagnosis: Inspect the plant for signs of pests like aphids, spider mites, or mealybugs. Look for physical damage to the leaves, stems, or flowers.
Solution:
  • Manual removal: Remove pests manually using a soft cloth or by spraying water to dislodge them.
  • Natural pest control: Use insecticidal soap or neem oil as a safe and effective way to control pests.
  • Isolation: Isolate the affected plant to prevent the spread of pests to other plants.
Fungal and Bacterial Infections
Symptoms: Leaf spots, mold, wilting.
Diagnosis: Look for irregular spots, fuzzy growth, or a foul smell, which are signs of infections. Fungal infections often appear as powdery or downy growths on the leaves.
Solution:
  • Remove affected leaves: Carefully remove and dispose of any affected leaves to prevent the spread of the infection.
  • Improve air circulation: Ensure there is adequate space between plants to allow air to flow freely, reducing humidity and the likelihood of fungal growth.
  • Use fungicides or bactericides: Apply these treatments as needed, following the instructions on the label.
3. Preventative Measures
  • Proper Watering: Learn the specific water needs of your plants and stick to a consistent watering schedule. Avoid both overwatering and underwatering.
  • Appropriate Lighting: Understand the light requirements of each plant and place them in suitable locations. Adjust as necessary throughout the year.
  • Regular Feeding: Use fertilizers as directed and avoid overfeeding. Provide the right balance of nutrients based on the plant’s growth stage and requirements.
  • Pest Management: Regularly inspect plants for signs of pests and take immediate action if found. Practice good hygiene by cleaning plant leaves and removing debris.
  • Clean Environment: Keep plant areas clean and free of fallen leaves or debris that can harbor pests and diseases. Regularly sanitize gardening tools and pots.
4. When to Seek Professional Help
If you’ve tried the above solutions and your plant is still struggling, it might be time to seek help from a professional. Garden centers, plant nurseries, or online forums can provide expert advice and assistance. Professional gardeners and horticulturists have the expertise to diagnose and treat more complex plant issues.
Understanding and addressing plant problems can be a learning experience. By carefully observing your plants, diagnosing issues accurately, and applying the appropriate solutions, you can ensure your plants remain healthy and vibrant. Remember, each plant is unique, and with a little patience and care, you’ll become adept at keeping your green friends thriving.