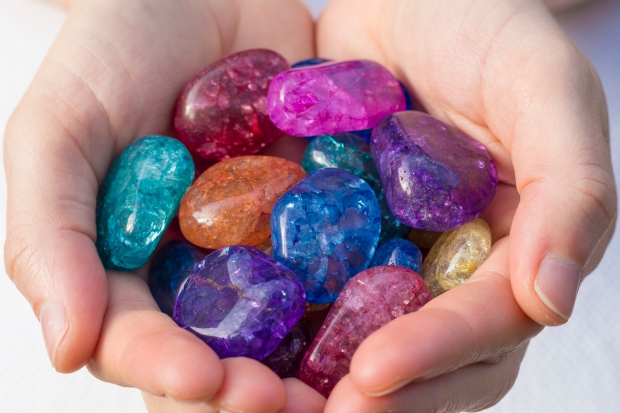
不同類型的治療水晶
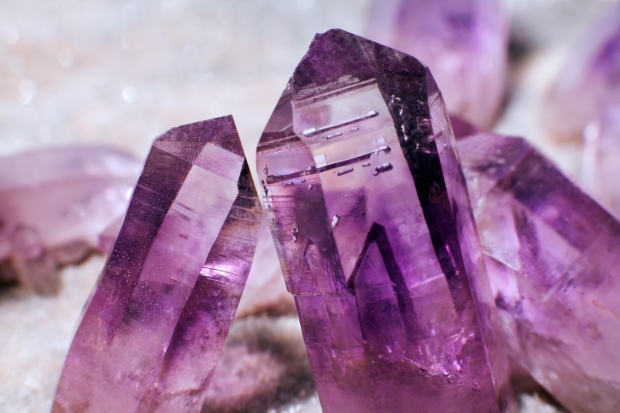
紫水晶被認為是一種強大的石頭,可以為精神和情感身體提供治療。它的正能量力量可以消除負能量,從而有可能提供更好的整體健康。把它放在臥室裡,讓你睡得更安穩。它可以在家中使用,以鼓勵住在裡面的人之間的和諧與團結。
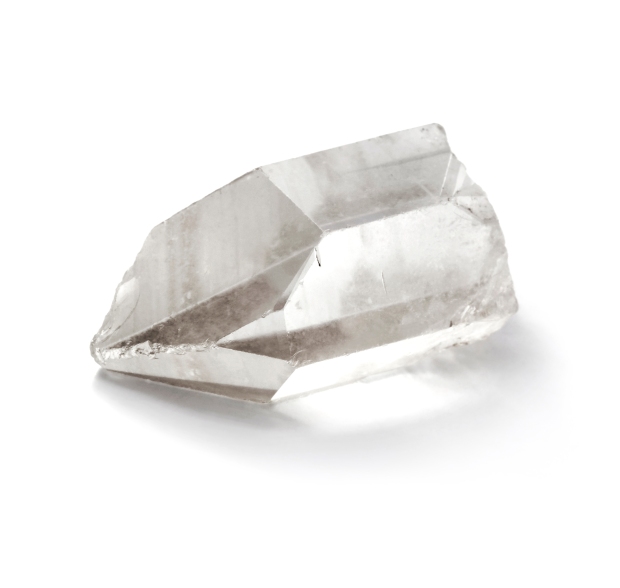
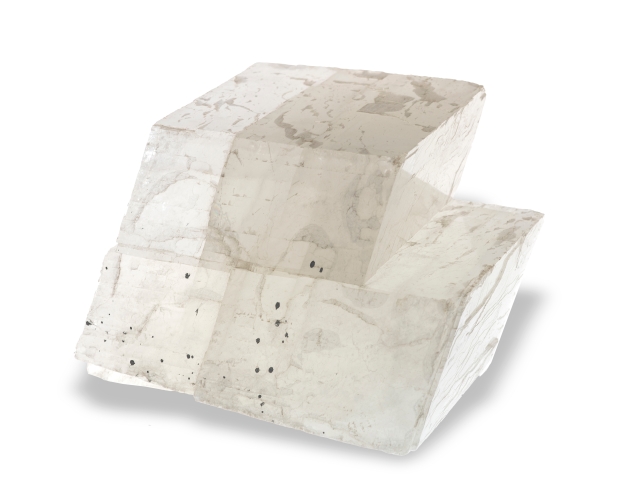
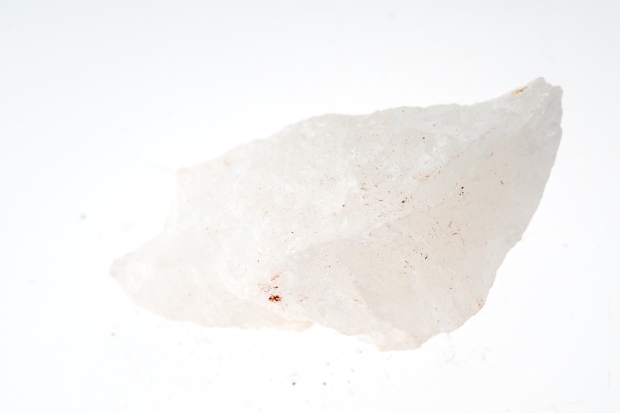
白水晶與冠脈輪的關聯意味著它可能對大腦產生重大影響。據說它可以解鎖通靈能力,增加註意力並釋放丟失的記憶。信仰是白水晶連接所有脈輪並鼓勵靈魂的淨化。從生理上講,它被認為可以激活免疫系統和新陳代謝,這對任何想減肥的人來說都是很棒的!
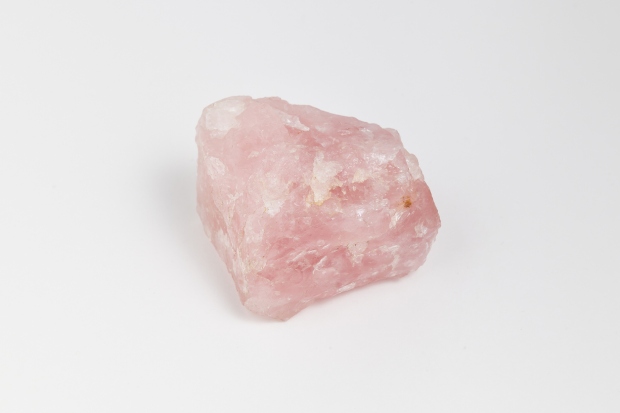
粉晶通常被稱為“愛情之石”,因為愛、喜悅、接受和情感治癒的強烈振動。在家庭中使用它來治愈關係和帶來合一對信徒非常有幫助。它適用於心臟、高級心臟和胸腺脈輪,據說經常使用可以改善生活的各個方面。
方解石是一種極好的石頭,可以消除精神能量的障礙,並允許積極的振動流動以進行治療。它可以刺激大腦並有助於提高記憶力。在冥想中使用時,可以放下過去,恢復對未來的希望。它的高振動還可以提高活力,增強熱情。
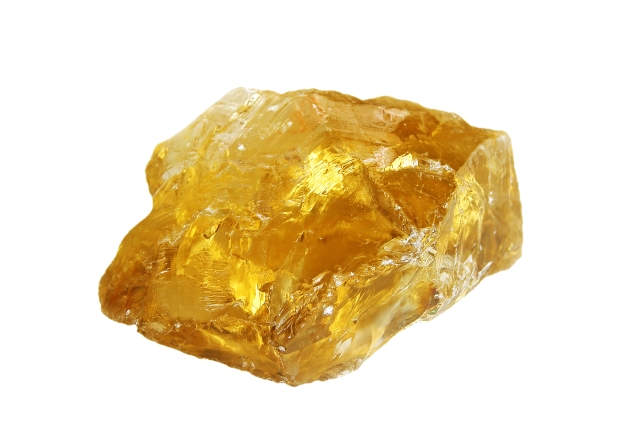
黃水晶被認為提供強大的治療能量,以幫助顯化豐富和財富。它給許多用戶帶來快樂和快樂,並提供正能量來緩解恐懼、消極和焦慮。據稱,它還提供了清晰的思想並提高了精神半透明性。
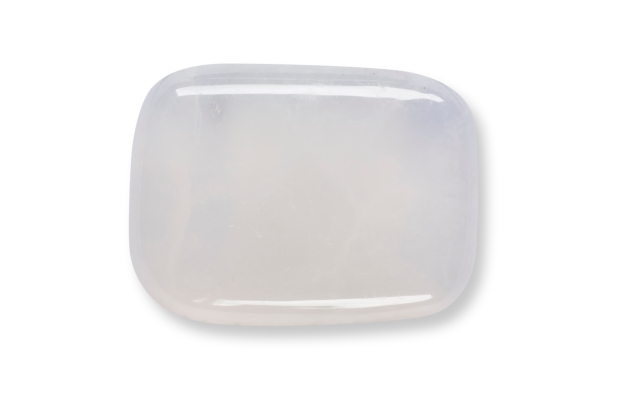
玉髓被認為是一種強大的治療石,可以作用於所有脈輪,以平衡思想、身體和精神。它去除負能量,讓正能量流過。它可能有助於治愈悲傷和絕望的情緒,並且經常在冥想中使用以恢復希望和熱情的感覺。
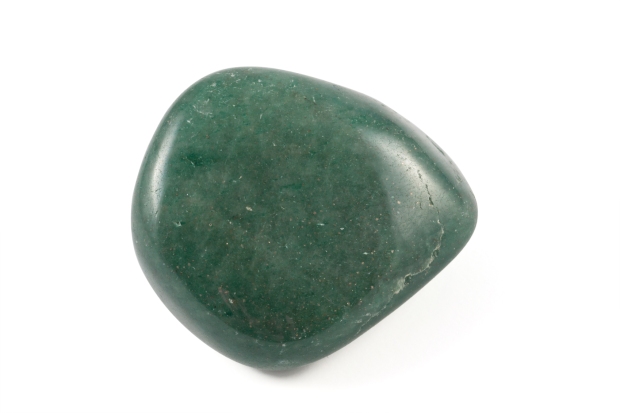
砂金石是一種能量放大石,可以幫助顯化。它通常被認為是一種好運石,因為它可能有助於吸引繁榮和好運。它增強了創造力並加強了領導技能。它通常被用作情緒助推器,可以促進更好的活力和幸福感。
乳石英被認為是一種強大的石頭,可以淨化全身並連接所有脈輪。據說它與第三隻眼和頂輪明確連接,打開通靈能力並提高注意力、記憶力和溝通能力。治療師認為, 乳石英在增強免疫功能和治療頭痛、偏頭痛、暈車、膀胱感染和皮膚病方面非常出色。
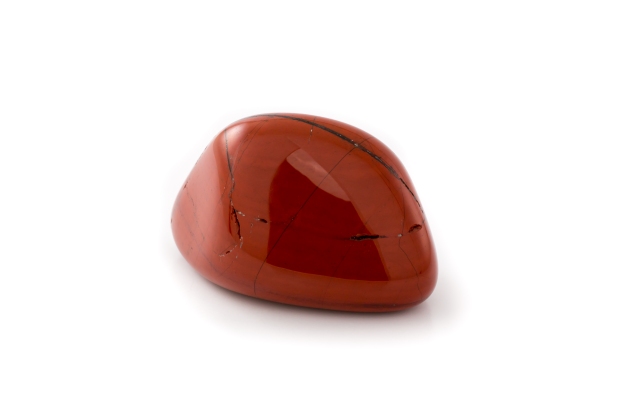
南非紅碧玉被認為是為用戶提供平衡和穩定感的基石。它作用於較低的脈輪以增強創造力,同時提供完成事情的意志力。目的是為用戶提供更深入的洞察力,以便他們可以看到過去當前的挑戰並創建更好地滿足其更高目標的解決方案。
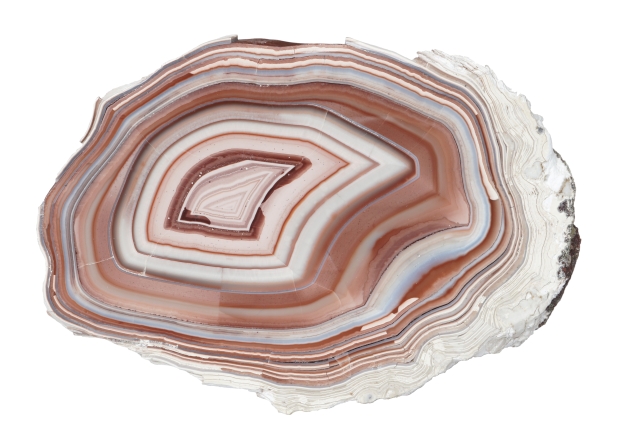
瑪瑙被認為是一種基礎石,根據石頭的顏色具有許多不同的治療效果。在冥想中使用時,它可以增強精神意識並激發通靈能力。伴隨著這種意識而來的是自我真相以及自尊和自信的建立。
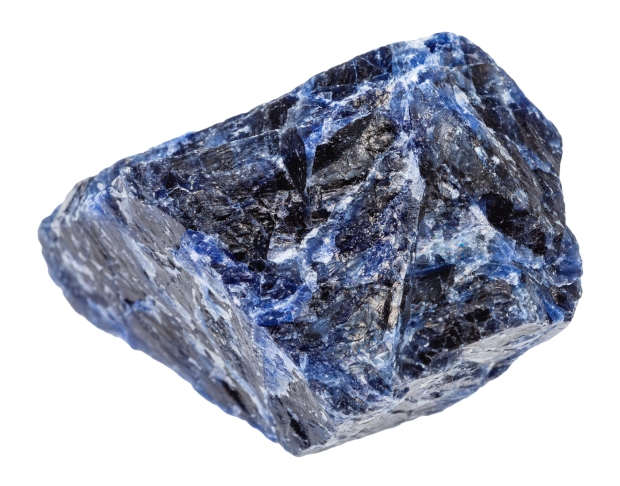
方鈉石是一種堅固的石頭,當用於第三隻眼脈輪時,可能有助於發展心靈能力。據報導,它作用於喉輪以幫助交流,尤其是在公開演講領域。在此過程中,它可能有助於激發創造力並鼓勵認知思維技能。
黑玉髓與基礎脈輪最相關。這種聯繫被認為可以幫助佩戴者/持有者在心理和情感上接地,讓他們體驗更深刻的直覺。據推測,它可以解鎖內心的想法和情緒,從而能夠識別有害的行為模式。 黑玉髓獲得的穩定可能有助於帶來深刻的平靜感。
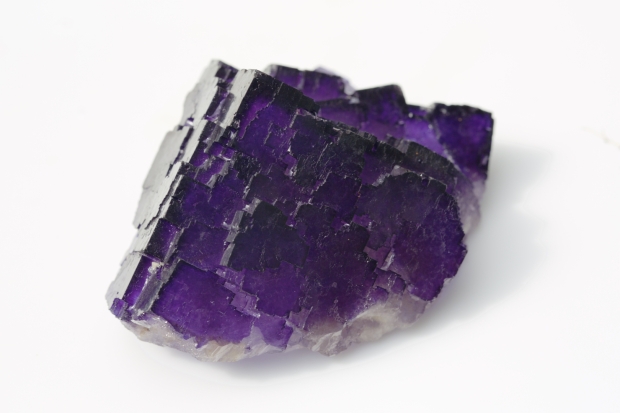
螢石被認為可以激發思想並提高頭腦的清晰度。是祛除負能量的極好寶石。這可能有助於減輕壓力和困惑,從而為思想、身體和精神提供更強大的治療作用。
據說,冠和第三眼脈輪的激活發生在冰紋石的存在下。使用這塊石頭作為護身符可以抵禦邪惡和負能量,並可以幫助擁有者保持積極向上。通過清理頭腦, 冰紋石可能會使樂觀變得更容易,並使您更加務實。
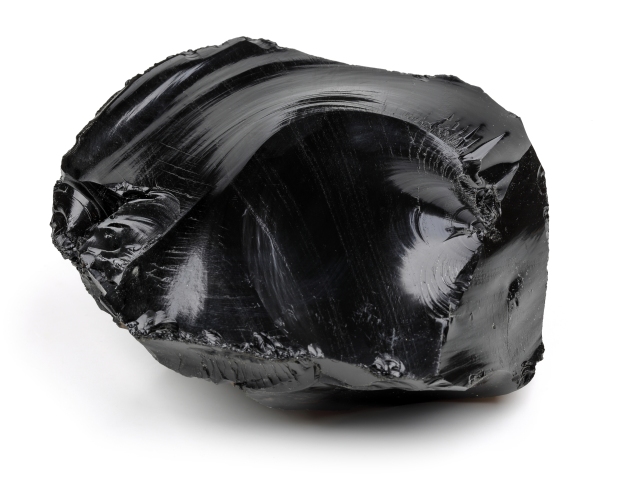
Paste Descri黑曜岩被認為是一種保護石,可以通過增強真相的特性來抵禦負面影響。據說它可以使頭腦清晰,消除有時會導致混亂的精神壓力和緊張。您可以隨身攜帶它以幫助抵禦負面力量或將石頭放在家中、辦公室或任何需要保護能量的地方。ption
本節中包含的信息本質上是形而上學的。水晶不應用作醫療的替代品。
أنواع مختلفة من بلورات الشفاء
جمشت هو حجر قوي يمكن أن يوفر الشفاء للجسد الروحي والعاطفي. تزيل قوى طاقتها الإيجابية الطاقة السلبية لتوفير صحة عامة أفضل. احتفظ به في غرفة النوم للحصول على نوم أكثر راحة. يمكن استخدامه في المنزل لتشجيع الانسجام والوحدة بين أولئك الذين يعيشون فيه.
مرو (معدن) بشاكرا التاج يعني أنه قد يكون له تأثيرات كبيرة على الدماغ. يقال إنه يفتح القدرات النفسية ويزيد التركيز ويطلق الذكريات المفقودة. الاعتقاد هو أن مرو (معدن) يربط جميع الشاكرات ويشجع على تطهير الروح. جسديًا ، يُعتقد أنه ينشط جهاز المناعة والتمثيل الغذائي ، مما قد يكون رائعًا لأي شخص يتطلع إلى إنقاص الوزن!
كوارتز وردي “حجر الحب” بسبب اهتزازات الحب القوية والفرح والقبول والشفاء العاطفي. إنه مفيد جدًا للمؤمنين عند استخدامه في المنزل لعلاج العلاقات وتحقيق الوحدة. إنه يعمل على القلب ، القلب الأعلى ، وشاكرات الغدة الصعترية ، وعند استخدامه بانتظام يقال إنه يحسن جميع جوانب الحياة.
كالسيت هو حجر ممتاز لإزالة انسداد الطاقة الروحية والسماح بتدفق الاهتزازات الإيجابية للشفاء. قد يحفز العقل ويساعد على تحسين الذاكرة. عند استخدامه أثناء التأمل ، يمكن للمرء التخلي عن الماضي واستعادة الأمل في المستقبل. قد تؤدي اهتزازاته العالية أيضًا إلى تحسين الحيوية وتعزيز الحماس.
حجر السترين يوفر طاقة شفاء قوية للمساعدة في إظهار الوفرة والثروة. يجلب السعادة والفرح للعديد من المستخدمين ويوفر قوة طاقة إيجابية لتخفيف الخوف والسلبية والقلق. يُزعم أنه يوفر أيضًا وضوح الفكر ويحسن الشفافية العقلية.
عقيق أبيض حجر شفاء قوي يعمل على جميع الشاكرات لتحقيق التوازن بين العقل والجسد والروح. يزيل الطاقة السلبية ويسمح للطاقة الإيجابية بالتدفق. قد يساعد في الشفاء العاطفي للحزن واليأس وغالبًا ما يستخدم أثناء التأمل لاستعادة مشاعر الأمل والحماس.
حجر الأفينتورين هو حجر تضخيم الطاقة يمكن أن يساعد في الظهور. غالبًا ما يعتبر حجر حظ سعيد لأنه قد يساعد في جذب الرخاء والحظ السعيد. يعزز الإبداع ويقوي المهارات القيادية. غالبًا ما يستخدم كمعزز للمزاج يمكن أن يساهم في تحسين الحيوية والسعادة.
Milky Quartz هو حجر قوي ، ينظف الجسم كله ويربط كل الشاكرات. يقال إنه يتصل بشكل صريح بالعين الثالثة وشاكرات التاج ، مما يفتح القدرات النفسية ويعزز التركيز والذاكرة والتواصل. يعتقد المعالجون أن Milky Quartz ممتاز في زيادة وظائف المناعة وشفاء الصداع والصداع النصفي ودوار الحركة والتهابات المثانة واضطرابات الجل
جاسبر أحمر حجر أساس يمنح المستخدم إحساسًا بالتوازن والاستقرار. إنه يعمل على الشاكرات السفلية لتعزيز الإبداع مع توفير قوة الإرادة لإنجاز الأشياء. والهدف من ذلك هو منح المستخدم رؤية أكبر حتى يتمكن من رؤية التحديات الحالية السابقة وإنشاء حلول تخدم غرضه الأعلى بشكل أفضل.
عقيق حجر أساس له العديد من التأثيرات العلاجية المختلفة اعتمادًا على لون الحجر. عند استخدامه أثناء التأمل ، فقد يعزز الوعي الروحي ويحفز القدرات النفسية. إلى جانب هذا الوعي تأتي حقيقة الذات وبناء احترام الذات والثقة.
صوداليت هو الحجر القوي الذي عند استخدامه على شقرا العين الثالثة ، قد يساعد في تنمية القدرات النفسية. يقال إنه يعمل على شقرا الحلق للمساعدة في التواصل ، وخاصة في مجالات الخطابة. على طول الطريق ، قد يساعد في تحفيز الإبداع وتشجيع مهارات التفكير المعرفي.
العقيق الأسود هو الأكثر ارتباطًا بشاكرا القاعدة. يُعتقد أن هذا الاتصال يساعد مرتديها / حاملها من خلال تأريضهم نفسياً وعاطفياً ، مما يسمح لهم بتجربة حدس أكثر عمقاً. من المفترض أنه يفتح الأفكار والعواطف الداخلية ، مما يتيح التعرف على أنماط السلوك الضارة. قد يساعد الاستقرار المكتسب من العقيق الأسود في إحساس عميق بالهدوء.
فلوريت يحفز الفكر ويعزز الوضوح العقلي. إنه حجر ممتاز لإزالة الطاقة السلبية. قد يساعد هذا في تخفيف التوتر والارتباك لتوفير إجراءات شفاء أقوى للعقل والجسد والروح.
يُقال إن تنشيط الشاكرات التاجية والعين الثالثة يحدث في وجود Crackle Quartz . قد يؤدي استخدام هذا الحجر كتميمة إلى درء الطاقات الشريرة والسلبية وقد يساعد المالك على البقاء إيجابياً. من خلال تصفية الذهن ، Crackle Quartz التفاؤل أسهل ويسمح لك بأن تكون أكثر واقعية.
سبج حجر حماية ، يحمي من السلبية بخصائص تعزز الحقيقة. يقال إنه يجلب الوضوح للعقل ، ويخرج التوتر الذهني والتوتر الذي يؤدي أحيانًا إلى الارتباك. يمكنك حمله معك للمساعدة في درء القوى السلبية أو الاحتفاظ بالحجر في منزلك أو مكتبك أو أي مكان تحتاج فيه إلى طاقة وقائية.
المعلومات الواردة في هذا القسم ميتافيزيقية بطبيعتها. لا ينبغي استخدام البلورات كبديل للعلاج الطبي.
Diferentes tipos de cristales curativos
La Amatista es conocida por direccionar energías positivas y bloquear energías negativas. Se le atribuyen propiedades que fortalecen la memoria, la concentración, alivio del estrés y control del mal humor. Estimula los chakras de la coronilla y la garganta. Se dice que alivia dolores de cabeza, relaja los músculos y ayuda a conciliar el sueño colocándola bajo la almohada.
En el contexto de las propiedades energéticas de los minerales, el Cristal de roca está considerado como el más útil y versátil de ellos. Desarrollado en múltiples formas tales como obeliscos, esferas o pirámides, este cristal está asociado al equilibrio espiritual y a la canalización energética. Se cree que puede facilitar la claridad mental y emocional, así como estimular los pensamientos y sentimientos positivos.
El Cuarzo rosa es considerada la piedra del amor y es el mineral principal alineado al chakra del corazón. Se le confieren propiedades para atraer el amor, fortalecer el romance y mejorar las relaciones tanto de pareja como amistades y familiares. El Cuarzo rosa también simboliza la inocencia por lo que se recomienda ponerlo en la habitación de los niños.
La Calcita es considerada una fuerte purificadora de energías negativas y amplificadora de las capacidades psíquicas del ser humano. Afina la intuición y la percepción, además de facilitar la conexión entre las emociones y el intelecto. En el ámbito físico, se cree que la Calcita fortalece el sistema inmune, articulaciones y ayuda a curar afecciones de la piel.
El Cuarzo citrino es considerado una piedra que atrae felicidad, abundancia y prosperidad. Se usa como colgante para proteger contra energías negativas y tóxicas de otras personas, y para combatir estados de ansiedad. El Cuarzo citrino representa la fuerza solar y se dice que por su alto poder de atracción es ideal para impulsar el aprendizaje y la creatividad.
La Calcedonia suele usarse para fortalecer la energía grupal y promover sentimientos de hermandad, compañerismo y generosidad. Se conoce por se le atribuyen beneficios para el sistema circulatorio y el sistema inmunológico. Otra propiedad que se le atribuye a la Calcedonia es la de combatir los síntomas de la demencia y senilidad aportando lucidez y energía. Es comúnmente usada en los dedos.
La Aventurina en el ámbito psicológico puede fomentar la toma de decisiones y el liderazgo, elimina la angustia y genera estabilidad. Protege el chakra del corazón por, lo que se le atribuyen propiedades beneficiosas para combatir problemas cardiovasculares, fortalecer el sistema nervioso y también se le confieren efectos antiinflamatorios. Se considera una piedra fuerte para atraer energías positivas.
Se dice que el Cuarzo lechoso ayuda a la eliminación de las energías negativas y al fortalecimiento espiritual. Este mineral suele ser empleado como un purificador de la mente que ayuda a deshacerse de ideas preconcebidas y aprender importantes lecciones vitales. Además, los sanadores lo consideran útil para la eliminación de la fatiga vital.
El Jaspe rojo se conoce como amuleto de protección contra energías negativas y el mal de ojo. Desde la antigüedad se usa en la cura de aflicciones digestivas y hepáticas. Se cree que ayuda a limpiar el aura y a alinear los chakras. Se cree que una piedra de Jaspe rojo en el bolsillo puede activar la energía del cuerpo en situaciones desafiantes.
Al Ágata se le atribuyen propiedades relajantes que ayudan a controlar la ira y la tensión, además de fortalecer la racionalidad, la memoria, la concentración y las habilidades analíticas. Se dice que, puesta en la frente, puede controlar fiebres y, puesta en las piernas, favorece la eliminación de líquidos. Es una piedra que aporta de equilibrio emocional y físico.
La Sodalita es una piedra reconocida por su belleza y por las propiedades beneficiosas que se le atribuyen. Se dice que puede ayudar al control del metabolismo, el sistema linfático, la glándula tiroides y la producción de insulina. La Sodalita es usada para estimular el tercer ojo y estabilizar las emociones para mantener en equilibrio la energía mental.
Se cree que la Calcedonia negra puede generar una apertura de pensamientos y sentimientos profundos que ayude a reconocer y liberarse de patrones negativos. Además, se dice que el poder de esta piedra estabiliza y equilibra los campos energéticos y favorece las reuniones tranquilas y positivas. Es por ello que algunas personas aconsejan colocarla en salas de reuniones o zonas donde se suela interactuar con otros.
Se piensa que la Fluorita es una piedra de organización, por lo que ayuda a mantener el perfecto orden del cuerpo, ayuda a cortar las influencias externas, fortalece la autoconfianza y combate las vibraciones negativas. La mejor ubicación de la fluorita es en las orejas. Se asocia con la protección del amor, las relaciones de pareja y la salud sexual.
El Cuarzo crepitante está considerado como un gran aliado a la hora de anular energías negativas, por lo que suele ser empleado como amuleto. Además, se piensa que promueve la recuperación de las emociones positivas, la claridad y la energía. Se cree que puede servir de ayuda a los estudiantes, dado que, como todo los cuarzos, fomenta la capacidad de concentración.
La Obsidiana se considera una piedra poderosamente protectora que aleja la negatividad y ayuda a encontrar el verdadero yo mostrando aspectos ensombrecidos como bloqueos mentales y traumas del pasado, por lo que se recomienda usarla con precaución. Se cree que ubicándola en el tercer ojo deshace las barreras de la mente y en el ombligo canaliza la energía del cuerpo.
La información contenida en esta sección es de naturaleza metafísica. Los cristales no deben usarse como reemplazo de un tratamiento médico.
Verschiedene Arten von Heilkristallen
Der Amethyst findet Verwendung in der Edelsteintherapie, wo er unter anderem gegen Alkoholsucht helfen soll. Weiterhin soll er das Stirnchakra beeinflussen und somit für Reinigung, Inspiration und Erkenntnisgewinn sorgen. Neben der Wirkung auf die mentale und physische Gesundheit wird der Amethyst auch für die energetische Reinigung von anderen Heilsteinen eingesetzt.
Dem Bergkristall wird eine beruhigende, reinigende und heilende Wirkung auf die Arterien und Blutgefäße nachgesagt. Zusätzlich soll er das Herz-Kreislauf-System stabilisieren und gegen Kopf-, Gelenk- und Rückenschmerzen helfen. Auch auf psychischer Ebene soll die reinigende Wirkung in Kraft treten und sich positiv auf Geist und Seele auswirken, wobei Energieblockaden aufgelöst werden können.
Rosenquarz gilt als ein Heilstein, der physische und mentale Schwächen bezüglich des Liebeslebens kurieren kann. Passend dazu wird dem Herzchakra zugeordnet und soll somit kräftigend auf alle Organe im Bereich um das Herz herum wirken. Es wird empfohlen, ihn je nach Anwendungsbereich im Raum aufzustellen oder unter das Kopfkissen zu legen.
Calcit wird als Heilstein für alles benutzt, was mit den Knochen zu tun hat: Sowohl das Knochengerüst als auch das Knochenmark und die Gelenke sollen von ihm profitieren. Auch für Kniebeschwerden, Bandscheibenvorfälle und zur unterstützenden Heilung bei Knochenbrüchen kommt er zum Einsatz. Dem Mineral wird außerdem eine beruhigende Wirkung nachgesagt.
Citrin soll als Heilstein gegen psychische Beschwerden wie Depressionen, Stress oder Kummer helfen. Ihm wird nachgesagt, dass er beim Verarbeiten schlechter Erfahrungen helfen kann und Neugierde auf neue Erlebnisse weckt. Es wird empfohlen, den Stein direkt am Körper zu tragen oder aber ihn während der Meditation zu verwenden.
Es wird empfohlen, eine längere Zeit des Hautkontakts mit dem Chalcedon herzustellen, um seine Wirkung zu entfalten. Über Nacht kann man auch eine Essenz herstellen, wenn man den Stein in Wasser legt und ihn einziehen lässt. Er soll förderlich für die innere Ruhe und Aufmerksamkeit sein sowie sich positiv auf Rhetorik und Selbstvertrauen auswirken und Hemmungen auflösen, weshalb er gern für kommunikative Situationen genutzt wird.
Dem Aventurin-Quarz werden sowohl physische als auch psychische Heileigenschaften zugesprochen. Er soll hilfreich gegen unreine Haut, Haarausfall und Allergien wirken. Auch gegen Augenkrankheiten wird er eingesetzt. Weiterhin soll er gut für die innere Ruhe sein und für einen gelassenen und geschmeidigen Geist sorgen.
Der Milchquarz ist für seine emotional reinigende Wirkung bekannt, und soll somit das Selbstvertrauen und die emotionale Stabilität fördern. Die populärste physische Wirkung soll der Energieschub, den der Stein verursachen können soll. Generell gilt der Milchquarz auch als ein Stein der Balance: Er harmonisiere alle Chakren und könne auch auf molekularer und hormoneller Ebene dazu beitragen, alles im Gleichgewicht zu halten.
Ein Roter Jaspis soll für die innere Zufriedenheit zuständig sein. Er wird weniger als Heilstein, sondern eher für das Aufladen von Energien eingesetzt. Ihm wird ein positiver Einfluss auf die eigene Willenskraft und das Durchsetzungsvermögen nachgesagt. Es wird empfohlen, den Stein direkt auf der Haut zu tragen oder ein Wasser mit ihm zuzubereiten und dieses zu trinken.
Dem Achat werden eine Vielzahl heilender Eigenschaften zugesprochen, darunter die Linderung von Hals- und Augenentzündungen, Krampfadern oder Wasserblasen, die sich an den Füßen gebildet haben. Auch auf die Psyche soll sich der Achat positiv auswirken, indem er innere Stabilität fördert und negative Energien abhält.
Sodalith wird als Heilstein verwendet, der für Mut, Ausdauer und ein selbstbewusstes Auftreten sorgen soll. Er wird für die Förderung eines klaren Kopfes eingesetzt, sodass man erfolgreicher an sich selbst arbeiten und schlechte Angewohnheiten sowie Schuld und Angst bekämpfen kann. Es wird empfohlen, ihn ausreichend lange als Kette um den Hals zu tragen oder aber auf die Stirn zu legen.
Schwarzer Chalcedon wird mit dem Basischakra in Verbindung gebracht. Von ihm geht eine Energie aus, die stabilisierend dabei helfen soll, sich mental und emotional zu erden und Einsicht in die eigenen negativen Emotionen zu gewinnen. Weiterhin wird ihm nachgesagt, die eigenen Energiefelder zu stabilisieren und auszubalancieren, so dass man sich in seinen Handlungen und Entscheidungen unterstützt und sicher fühlt.
Dem Fluorit werden verschiedene spirituelle Eigenschaften zugesprochen, welche die geistige Klarheit fördern sollen. Unter anderem gehören dazu die Fähigkeit, den Überblick zu behalten und Ziele in geordneten Schritten zu erreichen. Dem Stein wird auch nachgesagt, das Verständnis schwieriger Situationen zu erleichtern. Zur Anwendung wird beispielhaft empfohlen, ihn vor dem Lernen in der Hand zu halten.
Der Cracklequartz ist dafür bekannt, negativen Energien entgegenzuwirken, weshalb er besonders gern als Amulett verwendet wird. Er soll sogar noch einen Schritt weitergehen und auch bei der Wiedererlangung von positiven Emotionen und Energie helfen. Es wird empfohlen, ihn für die Meditation zu benutzen, wo er mit verschiedenen Chakra korrespondieren kann.
Dem Obsidian wird nachgesagt, dass er für den Schutz vor fremden Energien und gleichzeitig für das Lösen innerer Blockaden verantwortlich ist. Durch letzteres sollen bislang verborgene Fähigkeiten zum Vorschein kommen – der Obsidian steht für Veränderung. Körperlich soll er sich positiv auf den Blutdruck auswirken und kalten Händen und Füßen vorbeugen.
Die in diesem Abschnitt enthaltenen Informationen sind metaphysischer Natur. Kristalle sollten nicht als Ersatz für eine medizinische Behandlung verwendet werden.
さまざまな種類のヒーリングクリスタル
紫色は昔から高貴な色として知られていますが、その色を特徴とするアメジストを身につけると、感情をコントロールする力がもたらされると言われます。物事を冷静に判断できるようになり、所有者の魅力を引き出すといいます。恋愛運アップ効果も期待できるそうです。
ロッククリスタル (白水晶)はマイナスエネルギーを除去し、幸せをもたらす力があると言われます。自分の本当の願いが分かるようになり、信じる方向にまっすぐに前進させてくれると言います。アクセサリーなどで身につけるほか、原石や研磨された石を置物として室内に飾るとよいとされます。
ローズクォーツは愛と美の女神アフロディーテの石とされ、愛と美を育む力があると信じられています。ありのままの自分を愛するようになり、相手に思いやりと優しさを持って接することができるようになるといいます。内分泌系の働きを活発にし、若さと健康をもたらすパワーがあるとも言われます。
ホウカイセキ(方解石)は教養と感情をつなぐ力があると言われます。精神状態に安定をもたらし、洞察力や記憶力を高めるため、芸術や科学分野に従事する人に特に有益な石とされます。成功と希望をもたらす動機づけを作り、運命を切り開く可能性も秘めているそうです。
シトリンは富と繁栄をもたらす石として古くから親しまれています。黄色がお金と結びつき、財運アップの石として信じらています。また太陽ともイメージが重なることから、希望や元気に繋がるともいいます。第三のチャクラであるみぞおちやお腹に置いて横になると、気力や体力の回復に良いと言われます。
カルセドニーはいろいろな鉱物が集まってできたという性質から、社交術を高め人間関係を良好にするヒーリング効果があると言われます。身につけると緊張が緩和され、精神が柔軟になり楽天的に物事を考えられるようになるといいます。そして良縁につながる可能性が高まるそうです。
アベンチュリンはハートに作用するパワーストーンといわれています。ネガティブな感情を抑え、心の落ち着きを取り戻し、物事を冷静に判断できるように導いてくれるそうです。人間関係を穏やかにし、仕事にも成果をもたらすほか、不眠症にも効くと言われます。
ミルキークォーツは母のような優しいオーラを放つ石と考えられています。身につけたり所有すると、精神が落ち着き、イライラや憤りが鎮まると言われます。癇癪を起こし、泣き止まない子供をなだめるのに効果的だそうです。
セキヘキギョク(赤碧玉)は、地に足をつけ、バランスを保ちながらしっかり歩けるように見守ってくれる守護石と言われています。災難や事故、人間に関わる様々なトラブルを避け、目標を目指す力をサポートしてくれるといいます。マイナスな縁は自然と切れ、純粋に前進できるようになるそうです。
メノウ(瑪瑙)は結晶が集まってできた石という特質により、結束力を高め、共同作業をスムーズにさせる力があると言われています。また、リラックス効果があり、ストレスや不安を解消したいときに役立つそうです。胸の上に置くと、その効果が期待できるといいます。
ソーダライトは古代より守護石として利用されてきたと言われています。邪悪なものを遠ざけると同時に、心の内側に作用し、邪念、罪悪感、猜疑心を取り除き、精神力を高めるといいます。それによって勇気と希望に満ち溢れ、良い方法へ向かうようにサポートすると言われます。
ブラックカルセドニーは古くから平穏と関連づけられる石だと言われます。精神を落ち着かせ、ネガティブな要因を認識して開放すると考えられています。心の安定を継続させ、忍耐力を養い、至福をもたらすと言われます。
ホタルイシ(蛍石)は脳と結びついたパワーストーンだと言われています。脳を活性化させ、判断力、分析力、記憶力を高めるといいます。意識を高次元に持っていくため、勉強や仕事における集中力アップに役立つほか、抑圧された感情を解き放ち、発想を豊かにするとも言われます。
クラックル・クォーツはエネルギーを活性化させるパワーがあるとされ、気力が落ちている時、身近にあると効果を発揮し、思考を前向きにしてくれると言います。また自己の中の創造的な一面に気づかせてくれるそうです。
コクヨウセキ(黒曜石)は昔から持ち主に未来を見通す力を授ける石と言われ、現代ではビジネス面でお守りとしてそのパワーが期待されています。ネガティブなエネルギーに引っ張られるのを排除し、直感力や決断力を高め、決めた目標に向かって素早く進んで結果が達成できるようにサポートしてくれるといいます。
このセクションに含まれる情報は、本質的に形而上学的です。水晶は治療の代わりとして使用されるべきではありません。
Different Types of Healing Crystals
Amethyst is believed to be a powerful stone that can provide healing for the spiritual and emotional body. Its positive energy forces remove negative energy to potentially provide for better overall health. Keep it in the bedroom to induce more restful sleep. It can be used in the home to encourage harmony and unity among those who dwell within.
Clear Quartz’s association with the crown chakra means it may have significant influences on the brain. It’s said to unlock psychic capabilities, increase focus, and release lost memories. The belief is that Clear Quartz connects all the chakras and encourages the cleansing of the soul. Physically, it’s believed to energize the immune system and metabolism, which could be great for anyone looking to lose weight!
Rose Quartz is often referred to as the “Love Stone” because of strong vibrations of love, joy, acceptance, and emotional healing. It is very helpful to believers when used in the home to heal relationships and bring unity. It works on the Heart, Higher Heart, and Thymus chakras, and when used regularly is said to improve all aspects of life.
Calcite is an excellent stone for removing spiritual energy blockages and allowing for the flow of positive vibrations for healing. It may stimulate the mind and help to improve memory. When used during meditation one can let go of the past and restore their hope for the future. Its high vibrations may also improve vitality and enhance enthusiasm.
Citrine is believed to provide powerful healing energy to help manifest abundance and wealth. It brings happiness and joy to many users and provides a positive energy force to relieve fear, negativity, and anxiety. It purportedly also offers clarity of thought and improves mental translucence.
Chalcedony is considered a powerful healing stone that works on all of the chakras to balance the mind, body, and spirit. It removes negative energy and allows positive energy to flow through. It may help with the emotional healing of grief and despair and is often used during meditation to restore feelings of hope and enthusiasm.
Aventurine is an energy-amplifying stone that can aid in manifestation. It is often considered a good luck stone as it may help attract prosperity and good fortune. It enhances creativity and strengthens leadership skills. It is often used as a mood booster that can contribute to better vitality and happiness.
Milky Quartz is believed to be a powerful stone, cleansing the whole body and linking all of the chakras. It’s said to connect explicitly with the third eye and crown chakras, opening up psychic abilities and boosting concentration, memory, and communication. Healers believe that Milky Quartz is excellent at heightening immune function and healing headaches, migraines, motion sickness, bladder infections, and skin disorders.
Red Jasper is considered a grounding stone that provides the user with a sense of balance and stability. It works on the lower chakras to enhance creativity while providing the will-power to get things accomplished. The aim is to afford the user greater insight so that they may see past current challenges and create solutions that will better serve their higher purpose.
Agate is considered a grounding stone that has many different healing effects depending on the color of the stone. When used during meditation it may enhance spiritual awareness and stimulate psychic abilities. Along with that awareness comes self-truth and a building of self-esteem and confidence.
Sodalite is a strong stone that when used on the Third Eye chakra, may help in the development of psychic abilities. It reportedly works on the Throat chakra to aid in communication, especially in areas of public speaking. Along the way, it may help to stimulate creativity and encourage cognitive thinking skills.
Black Chalcedony is most associated with the base chakra. This connection is believed to help the wearer/holder by grounding them psychologically and emotionally, allowing them to experience more profound intuition. It supposedly unlocks inner thoughts and emotions, enabling the recognition of harmful patterns of behavior. The stabilization gained from Black Chalcedony may help to bring a deep sense of calm.
Fluorite is believed to stimulate thought and enhance mental clarity. It is an excellent stone for removing negative energy. This may help to alleviate stress and confusion to provide for more powerful healing action of the mind, body and spirit.
Activation of the crown and third eye chakras is said to occur in the presence of Crackle Quartz. Using this stone as an amulet may ward off evil and negative energies and may help the possessor to remain positive. By clearing the mind, Crackle Quartz might make optimism easier and allow you to be more pragmatic.
Obsidian is considered a protection stone, that shields against negativity with truth-enhancing properties. It is said to bring clarity to the mind, drawing out mental stress and tension that sometimes leads to confusion. You can carry it with you to help ward off negative forces or keep the stone in your home, office, or anyplace you need protective energy.
The information contained in this section is metaphysical in nature. Crystals should not be used as a replacement for medical treatment.

Plant Description – Content Creation
v.2.0.1-20211029
This writing task is to draw the first impression of a specific plant to the audience. Try to narrow the distance between unfamiliar plants and people, reducing alienation.
This section is the first section directly talking about the characters of the plant, so it is a “first impression” section. Interesting is in the first place, making an impressive and unique impression of the target plant is the key.
Daily usage or industrial value is encouraged, which is easy to echo the audiences’ memory of this plant. Reduce botanical description and measurement of the plants unless it is characteristic.
2.1 These facts are considered as interesting(Dos)
Tanacetum vulgare (Tansy)
_COMMON_NAME_ (_LATIN_NAME_) is a fragrant herb that has a scent similar to rosemary 【special character】. It was cultivated since Ancient Greece【History】, and its essential oil is still widely used today 【economical usage, while AVOIDed talking about their indications and efficacy in aromatherapy】. But take care, internally taking either _COMMON_NAME_ or its essential oil is toxic. 【toxicity】
Callistemon citrinus (Crimson bottlebrush)
_COMMON_NAME_ is a shrub commonly found in swamps and near rivers【When and where can you find them】. You can easily recognize this plant by its unique red flowers, shaped like a bottlebrush【special look】, hence it got the name “crimson bottlebrush”【name origin】. The flowers produce sweet nectar which is a source of food for numerous species of birds【wildlife attraction】.
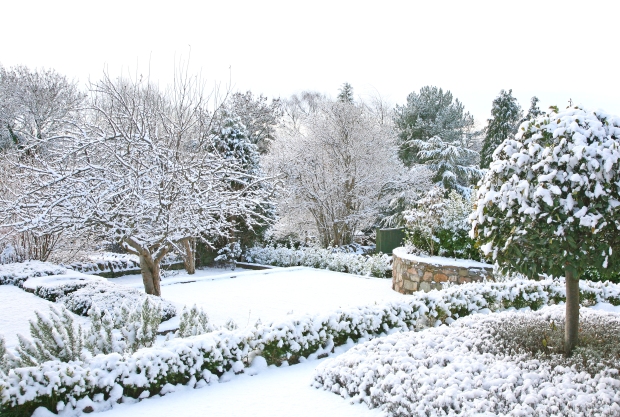
How to Protect Your Plants From Snow
Unexpected snowfall can harm garden plants and prevent them from thriving in the spring. Winter weather often causes stems to snap and kills vulnerable species. This article will teach you all you need to know about protecting your plants from heavy snowfall.
Winter weather may give you a break from the rigors of the gardening season, but this isn’t the time to leave your plants unattended. Unexpected snowfall can harm young plants and prevent them from thriving in the spring. Too much snow piled on top of fragile stems and branches can also cause them to snap.
If you live in a region that gets lots of snow, there are steps you can take to protect vulnerable plants from snow and ice damage. Here is everything you need to know about protecting your plants from the snow.

Before you start your snow protection process, it’s important to determine whether your plants need it in the first place. After all, if you’re growing varieties suited to your growing zone, the odds are good that these plants can withstand some snowfall without issue.
In fact, a thick layer of snow can act as insulation to protect plants from freezing winds and erratic temperature changes. You’ll likely find that sensitive plants fare better in cold weather when there are a few centimeters of snow covering the roots.

Problems with snow mainly occur when you’re dealing with wet, heavy snow that weighs down limbs and stems. Freezing temperatures make branches brittle, so even small amounts of snow can lead them to snap. In addition, delicate plants can be at risk from even a centimeter or two if they aren’t strong enough to survive bending over from the extra weight.
Not all plants need artificial snow protection. Most common landscaping plants, including cold-hardy perennials and bushes, should be strong enough to withstand the average snowstorm.

These plants have natural strategies to protect their tender buds from the cold to ensure they bloom in the spring. In fact, some varieties, including many fruit trees, require a set amount of “chill hours” that must be met before the plant gets the signal to start producing buds.
The plants that need the most protection from snow include the following:

While evergreen trees and shrubs can withstand cold weather, too much snow can make them lose their shape by causing the limbs to splay out. It’s best to knock off any snow that accumulates on the branches to prevent this. A long-handled broom works well for this task.
You can reduce the risk of snow accumulation altogether by pruning evergreens so that they taper towards the top. If you’d rather not change their shape, consider wrapping the plants with twine from top to bottom (like a Christmas tree) to prevent any snow from building up on the branches.

Your best strategy for protecting plants from snow depends on their size and type, but in most cases, it’s best to keep them covered. Here are several popular methods for covering plants.
Plants aren’t the only thing at risk in your garden from too much snowfall. Not only can heavy, wet snow cause damage to roofs, greenhouses, hoop houses, and outdoor furniture, but it can slide off unexpectedly and crush the plants below.
It’s smart to watch the weather forecast carefully and shovel off any snow that accumulates on fragile surfaces to prevent it from building up.
Likewise, be careful about applying salt or sand to pathways to reduce ice buildup. The melted slush can easily leach into nearby garden beds and affect their fertility for the next growing season.

While you may be tempted to spring into action as soon as you see signs of snowfall, in most cases, your outdoor plants will be perfectly fine with a little icy insulation. You can leave cold-tolerant plants undisturbed, as they will likely be as good as before once the weather warms again. This extra snow layer will also serve to keep the soil from freezing, which prevents far worse damage.
Finally, don’t be in a rush to prune or toss out plants that get damaged from snow, as chances are they will bounce back once the weather warms.
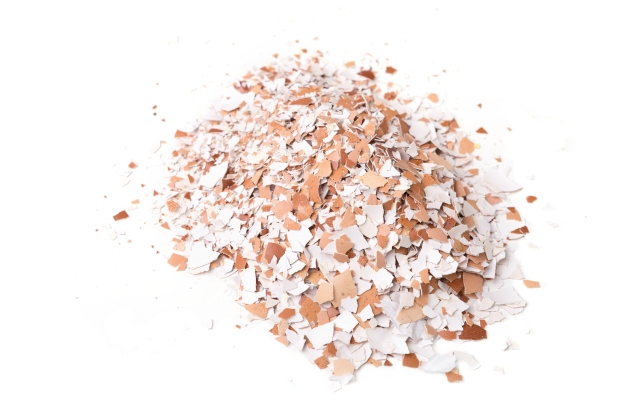
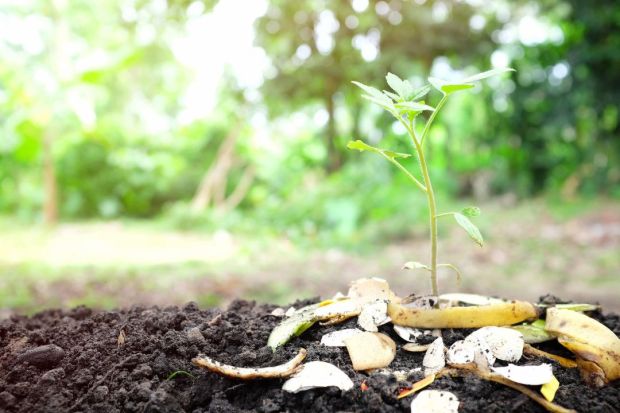
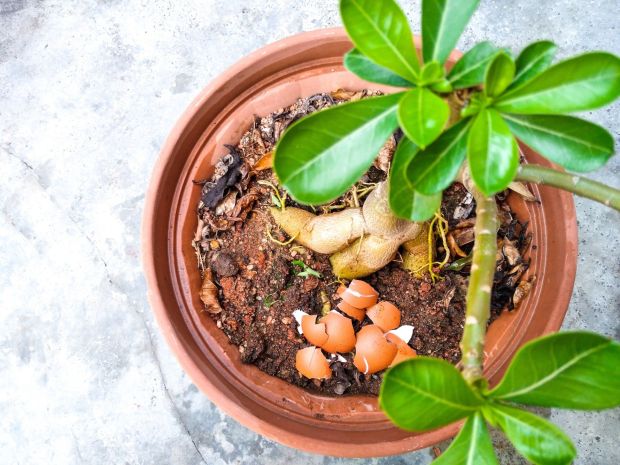
How to Use Eggshells to Improve Your Garden
Eggshells provide numerous benefits for your garden. They give your plants a nutritional boost, deter pests, and increase the soil’s pH. Here is everything you need to know about the benefits of eggshells, as well as how to use them in your garden.
Did you know that plants benefit from the addition of eggshells? Using eggshells in your garden can improve your plants’ growing conditions as well as give them a nutritional boost.
Whether you have an outdoor vegetable garden or you’re growing lots of indoor plants, you should hang onto eggshells and use them to help your plants thrive. Here is everything you need to know about using eggshells in your garden as well as a few tips to get started.

There are three major benefits that eggshells provide. Eggshells provide plants with nutrients, deter certain pests, and increase the soil’s pH. Below is more information about these amazing benefits.
Eggshells primarily contain calcium carbonate, which is a mineral that plants need for healthy growth. This calcium helps strengthen the cell walls of the plants, just like it helps strengthen bones in humans and animals.
The shells also contain small amounts of phosphorus and potassium. Phosphorus helps plants form new roots, seeds, flowers, and fruit. Potassium strengthens the stems and helps the plant to grow.
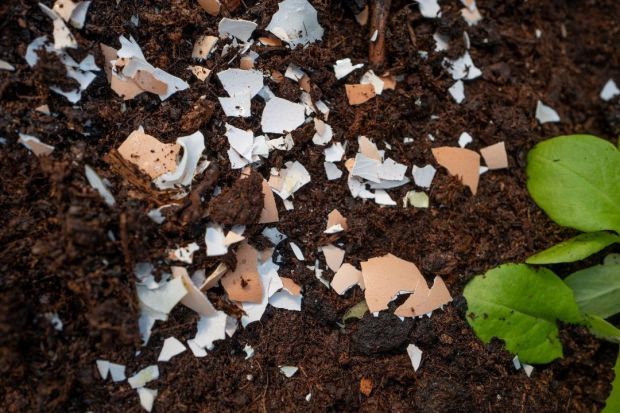
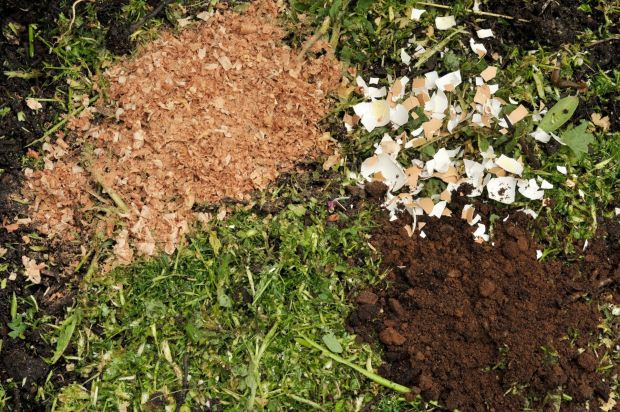
If your garden is overrun with snails and slugs, you can use crumbled-up eggshells to keep them off your prized plants. These pests are not able to crawl over the shells because of their sharp, brittle nature. Any snail or slug that tries to crawl over these eggshells will get wounded easily.
To keep slugs and snails at bay, just spread the shells around the base of your plants on top of the soil. Use the shells to create a barrier that’s around 2 inches (~5 cm) wide for best results.
Another benefit of using eggshells in the garden is that the calcium helps raise the soil’s pH. It’s very similar to adding lime to make your soil more alkaline. Many plants have a hard time growing in acidic soil, so eggshells can help balance the pH for better growing conditions.
However, if you don’t want your eggshells changing the pH of the soil, then you can mix crushed eggshells with coffee grounds before adding them to their garden. The acidity of the coffee grounds will counteract the alkalinity of the eggshells.
Most plants will benefit from the addition of extra calcium, potassium, and phosphorus. However, certain plant varieties benefit more. These include fruiting vegetables such as peppers, tomatoes, and eggplants. This is because the extra calcium helps to prevent blossom end rot.
Calcium-rich vegetables such as spinach, broccoli, swiss chard, and cauliflowers will also happily take up the extra calcium that you provide with the eggshells.
Now that you know the benefits of adding eggshells to your garden, it’s time to put them to work. Here are few ways you can utilize eggshells to improve your plants’ health and growth.
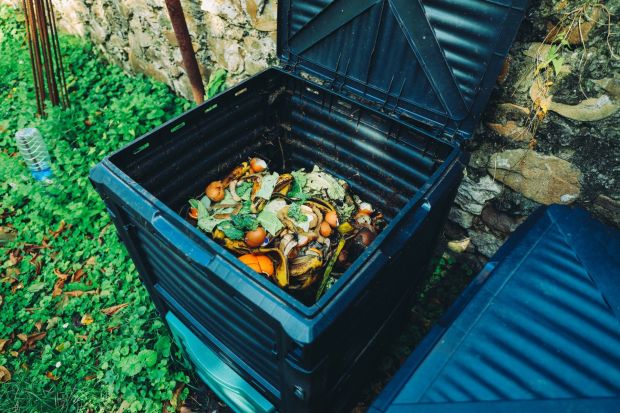
Just as you add all your veggie scraps and your grass clippings to your compost, you should add your eggshells as well. The minerals in the shells will break down and add valuable nutrients into the compost as it’s brewing.
You can just throw them straight in, but they do take a little time to break down. Therefore, if you have fast brewing compost, you might need to crumble or grind them up first.
The best way for your plants and soil to reap the benefits of eggshells and is by placing them directly into your planting holes. This will give your plants direct access to the eggshells, as well as all of their benefits.
Just make sure to crumble the eggshells before placing them in the soil. This helps them break down faster so your soil and plants can utilize the nutrients as soon as possible.
You can give all your indoor plants a healthy boost by making eggshell tea. Here’s how:
If your plants haven’t been repotted for a while, you should see them looking much better after you’ve applied this eggshell tea.
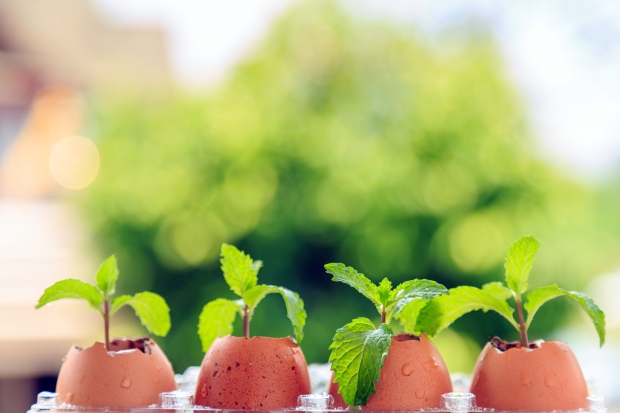
As you now know, eggshells break down over time and add goodness to the soil. But their total breakdown can take quite some time. Therefore, they are ideal to use as seed starter “pots.”
Here’s a quick way to use your eggshells as seed starters:
Once the seeds have germinated, and the little seedlings are large enough, you can plant them straight into your garden still in the shell.

Now that you know about the benefits of eggshells, it would be wasteful not to use them in your garden! Follow any of the suggestions above to give your plants a nutritional boost and improve their growing conditions.
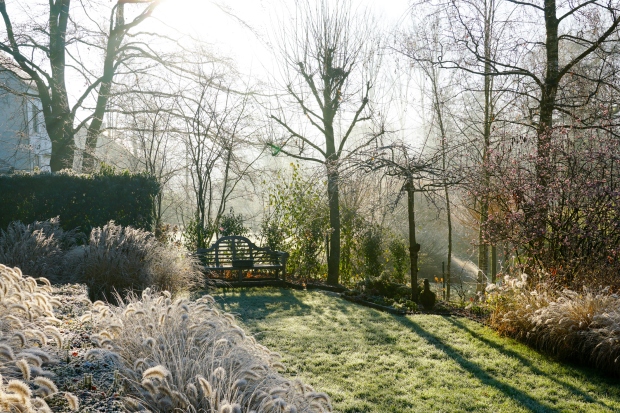
How to Protect Your Plants From Wind Damage in Winter
Winter weather can be brutal on plants, reducing their growth rate and making them brittle and fragile. Thankfully, with landscape design and preparation, you can protect your plants from the worst of it.
Winter wind can be the enemy of garden plants. The combination of strong winds and cold temperatures can leave your plants brittle and fragile, as well as slow down their growth. Even low levels of wind can cause long-lasting damage to your plants during wintertime.
Thankfully, there are steps you can take today to help protect your plants from chilling winter winds. With some proper landscape design and preparation, you can keep your plants safe and ensure they don’t suffer extreme wind damage this winter.

Wind happens all year long, so why is it especially concerning in the winter? The combination of strong wind and cold temperatures is hard on plants and makes them more brittle. This makes them more likely to snap and experience other significant damage.
Top-heavy winter vegetables like Brussels sprouts are especially at risk, as strong winds will rock them back and forth, damage their feeding roots, or even topple them out of the ground.
Even lower wind speeds are dangerous for plants when paired with wind chill. Blowing wind removes heat from around plants faster than still air, leading to frost damage for sensitive varieties. Without proper protection, you’ll deal with blown-off leaves, broken stems and branches, and soil erosion.

The best way to prevent winter wind damage is to prepare for it while designing your landscape. By utilizing stronger plants and other elements of your landscape, you can protect your garden plants from harsh winter winds and prevent them from becoming damaged.
Many gardeners establish windbreaks such as hedgerows, trees, and fencing to slow down gusts of wind entering their yard. Some even plant around buildings and other structures to provide their plants with year-round protection.
Keep in mind that these physical barriers can also increase the risk of wind damage. Think of walking past a tall building on a windy day. Depending on the wind direction, it channels and concentrates the wind within it so you feel it more intensely.
Plants will feel the same effect when planted near walls or fences. Pay attention to the typical wind direction in your area so you can position plants where they will be most sheltered.
One of the most natural ways to protect plants from winter wind damage is to allow them to support each other. One summer example is the “three sisters” Native American planting method, where squash and bean vines are supported and protected by corn plants that grow nearby.
You can follow a similar strategy by planting perennials or placing potted plants near tall shrubs and trees to protect them from the wind.
If soil erosion is a concern, consider laying mulch or planting in containers of raised beds that aren’t filled to the brim. This protects the topsoil from direct wind exposure.
No matter your garden setup, there are steps you can take to protect your plants from wind damage.
When the forecast shows a winter storm is coming to your region, it’s smart to prep your outdoor space by clearing up anything that could go airborne. This means moving potted plants, putting garden tools away, and securing any outdoor furniture that could get blown away by strong winds.

Be especially careful to remove overhanging branches from places where they could cause damage when they fall. The combination of cold weather with wind makes branches brittle and far more likely to fall than during pleasant conditions.
The taller the plant, the more likely it is to suffer damage from winter winds. Fragile bushes and newly planted perennials that don’t yet have deep roots are also at risk.
Your best option is to stake them in place with posts or secure them to sturdy objects so that they will have some support against the wind. Ideally, you want them to be able to sway slightly with the strongest gusts without facing the full brunt of it. This lowers the chance they will break off at the base.
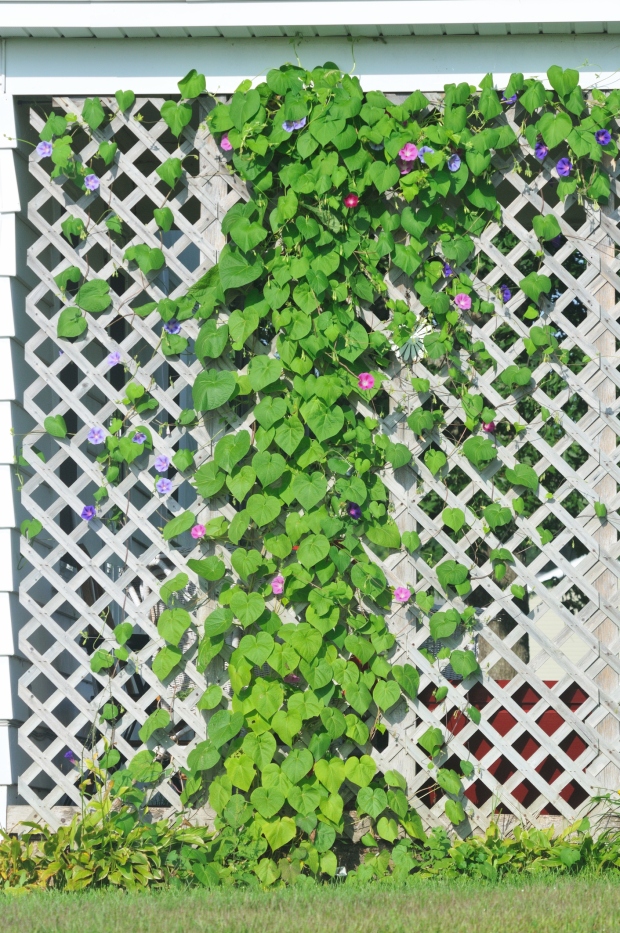
Climbing vines should be securely tied to their trellising at regular intervals so the wind can’t cause them to break off. In cases of extreme weather, consider pulling the vine off the trellis entirely and laying it on the ground where the wind won’t affect it.
If you want to avoid these problems altogether, consider pruning susceptible plants in late fall. By keeping plants small, you can ensure they are less likely to catch the wind and get damaged in the process.
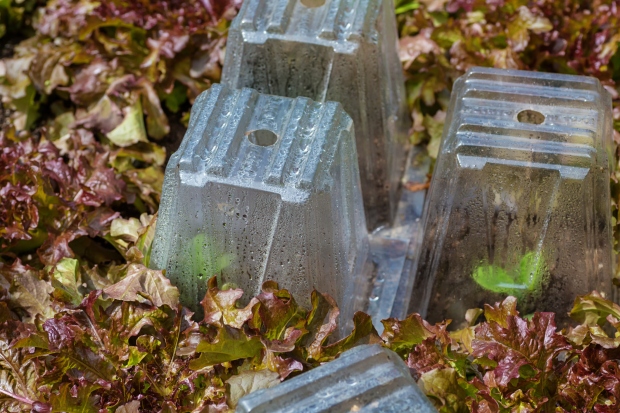
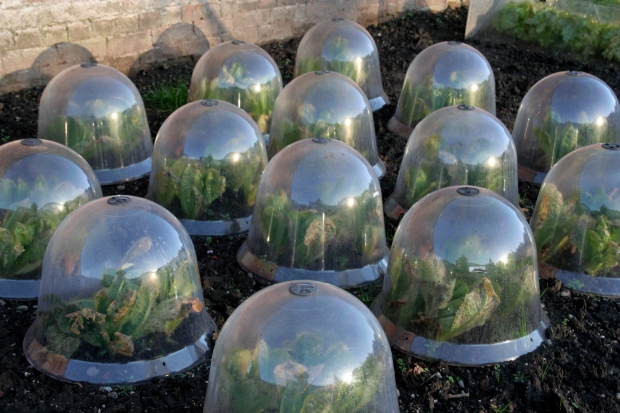
One of the best ways to protect small plants from winter wind is with cloches. These small, translucent covers go directly overtop plants to protect them from cold temperatures. They act as miniature greenhouses to retain heat and keep out the worst of the elements.
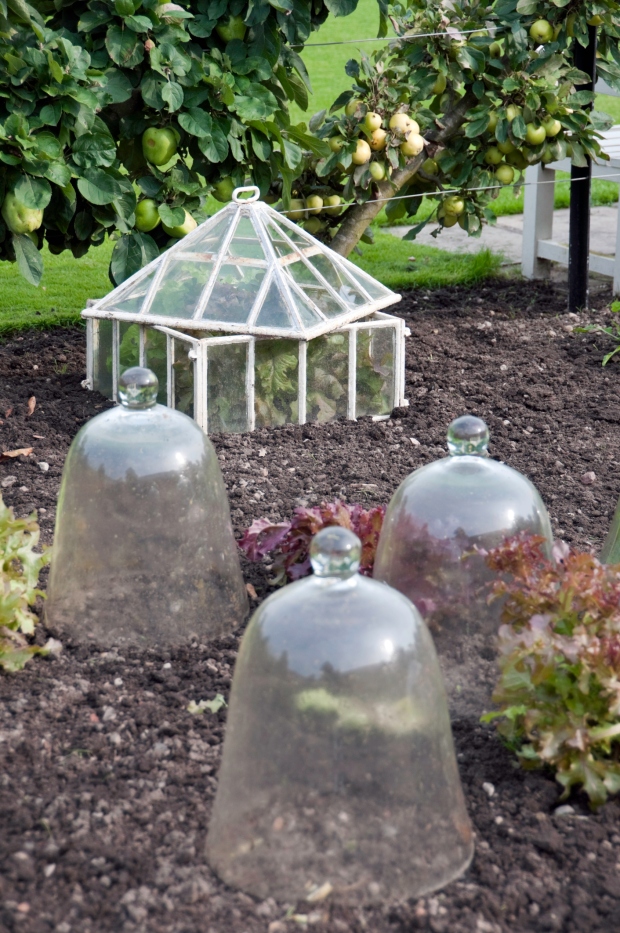
It’s wise to keep cloches on hand to use when the forecast looks bad. Any glass or transparent plastic container can work, so consider keeping mason jars and old food containers to use. Don’t leave the cloches on plants too long once the weather improves, as they can quickly overheat.
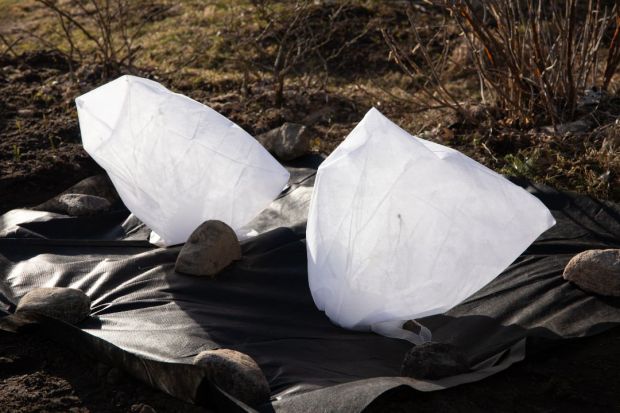
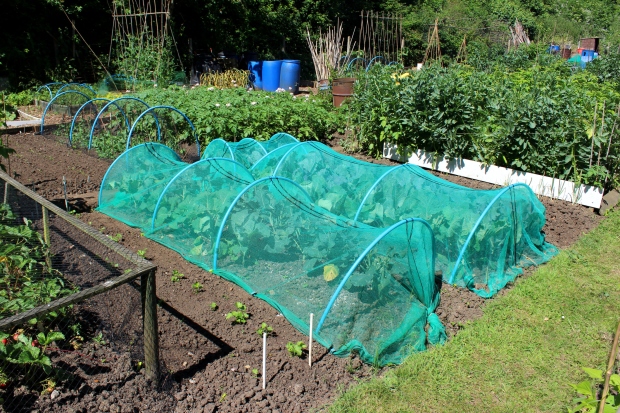
Looking to cover more plants at once? You can set up net cloches over entire garden beds. These are made from wire or polytunnel frames that are covered with greenhouse plastic outdoor netting. They let some wind through but keep out the worst of it to keep plants protected. Again, remove plastic once the weather warms to prevent overheating.
Keeping plants safe through the changing seasons can be a challenge. You can remove the risk of wind damage this winter through innovative planting strategies and added protection when the forecast calls for it.
Taking the time to think through your wind protection plan will save you time and heartbreak by guaranteeing more plants make it to spring unscathed.